
How to create, edit and use email templates in Gmail

To create an email template in Gmail, open the Shared Email Templates pane, draft your message, add dynamic macros or attachments, and save it. When needed, click the Insert button next to the template name to use it in a new email.
While Gmail includes a built-in template feature, a specialized add-on like Shared Email Templates & Signatures for Gmail lets you personalize emails automatically, include attachments, add links and clickable buttons, create and insert signatures, and even share templates across your team.
Let’s walk through how to build, insert, and update dynamic email templates in Gmail using Shared Email Templates 👉 .
What is an email template in Gmail?
An email template is a saved message draft you can reuse whenever you send repetitive emails. Instead of typing every new email from scratch, you insert a template, tweak a few details, and hit send.
If you regularly reach out to potential customers or reply to support tickets, you almost certainly have a personal stash of templates saved somewhere. In Gmail, most people rely on Drafts to keep them at hand, even though it’s pretty inconvenient. Ironically, Gmail actually has a built-in Templates feature designed for this exact job.
So why do so many users ignore it?
Native Gmail Templates vs. Shared Email Templates
Gmail has a native feature called Templates (opens in a new tab) (you might remember it as Canned Responses). It lets you save basic text, subject lines, and images to reuse later. While they certainly speed things up, you still have to manually edit specific details and attach required files every single time.
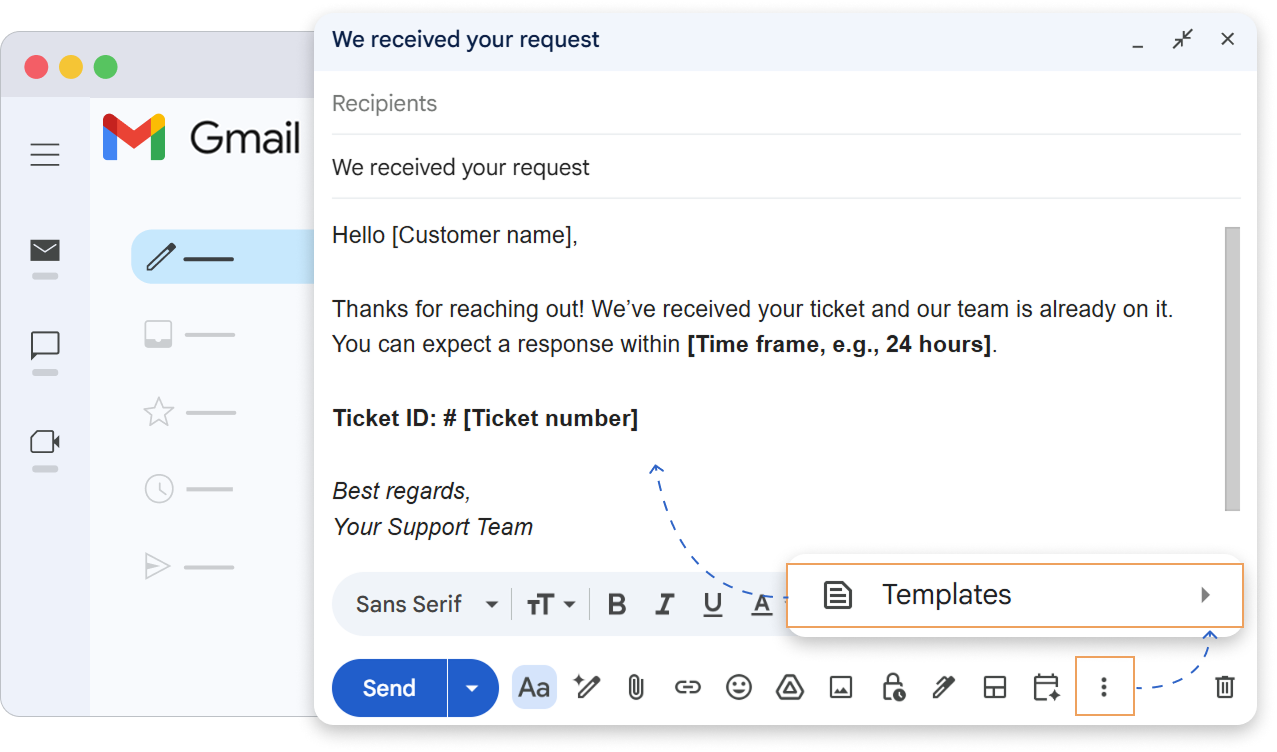
Tip
Read our step-by-step guide on how to set up and manage native Gmail templates (opens in a new tab).
To automatically insert recipient names, attach files, use interactive fields, pull live data from Google Sheets into your templates, and share them with your colleagues, you need a dedicated add-on like Shared Email Templates & Signatures rather than native Gmail templates.
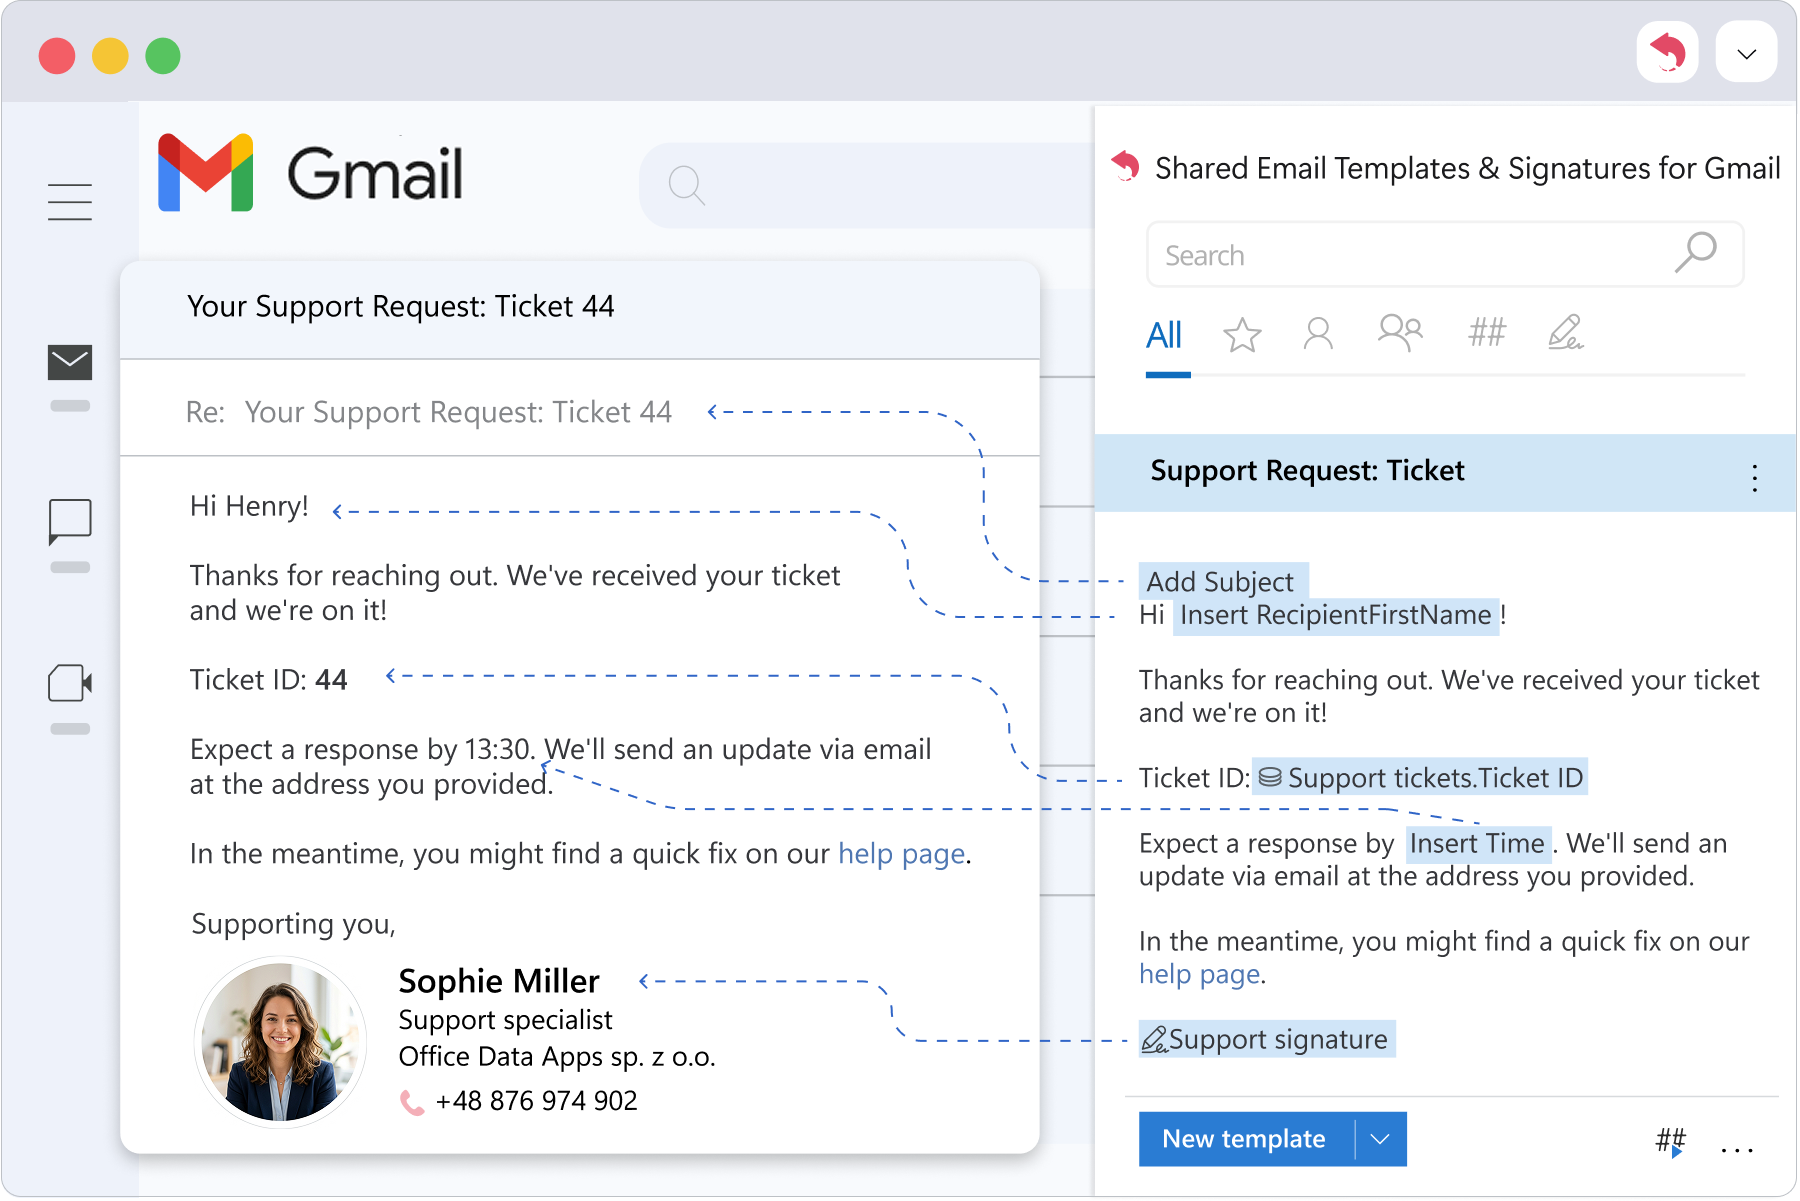
If you’re wondering whether native Gmail templates are enough for your specific case, this table shows the key differences:
| Feature | Native Gmail Templates | Shared Email Templates |
|---|---|---|
| Editing | Basic editor and lack of HTML mode | Feature-rich editor and a full HTML code viewer |
| Attachments | Unsupported: attached files are automatically stripped out | Automatic attachments: files or Google Drive links |
| Personalization | Static text only | Smart placeholders, fillable fields |
| Presets | Only saves Subject line | Pre-fills To, Cc, Bcc, and Subject lines |
| Conditional logic | Unsupported | Conditional Insert-if macros |
| Organization | Basic dropdown list | Sidebar with nested folders, favorites, and instant search |
| Collaboration | Locked to individual accounts; no team sharing | Shared team folders with role-based permissions |
To see how it works, let’s build a cold outreach template from scratch.
How to create your first email template in Gmail
Imagine you’re reaching out to a potential client. You want to create a template that includes:
- Personalized greeting and closing line
- Side-by-side images in a borderless table
- Clickable call-to-action button
- Auto-attached PDF
Let’s see how we can do it 👉
Step 1: Open the editor and name your template
- 1.
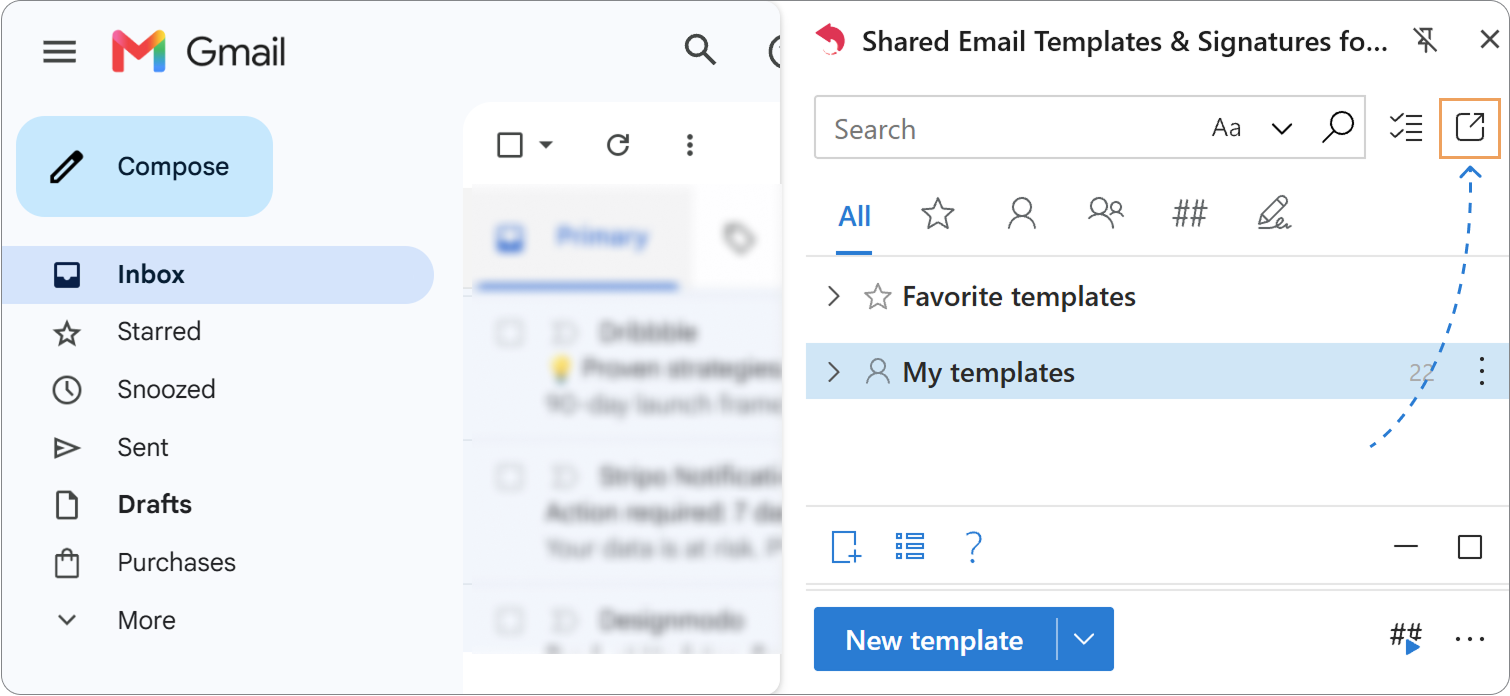
In Gmail, open the Shared Email Templates extension sidebar.
- 2.
Click the Open in browser icon in the top-right corner of the sidebar.
Note
You can click the New Template button and start creating your template right here. But using the full browser tab gives you a much larger and more comfortable workspace. That’s why we’ll switch to the browser tab.
- 3.
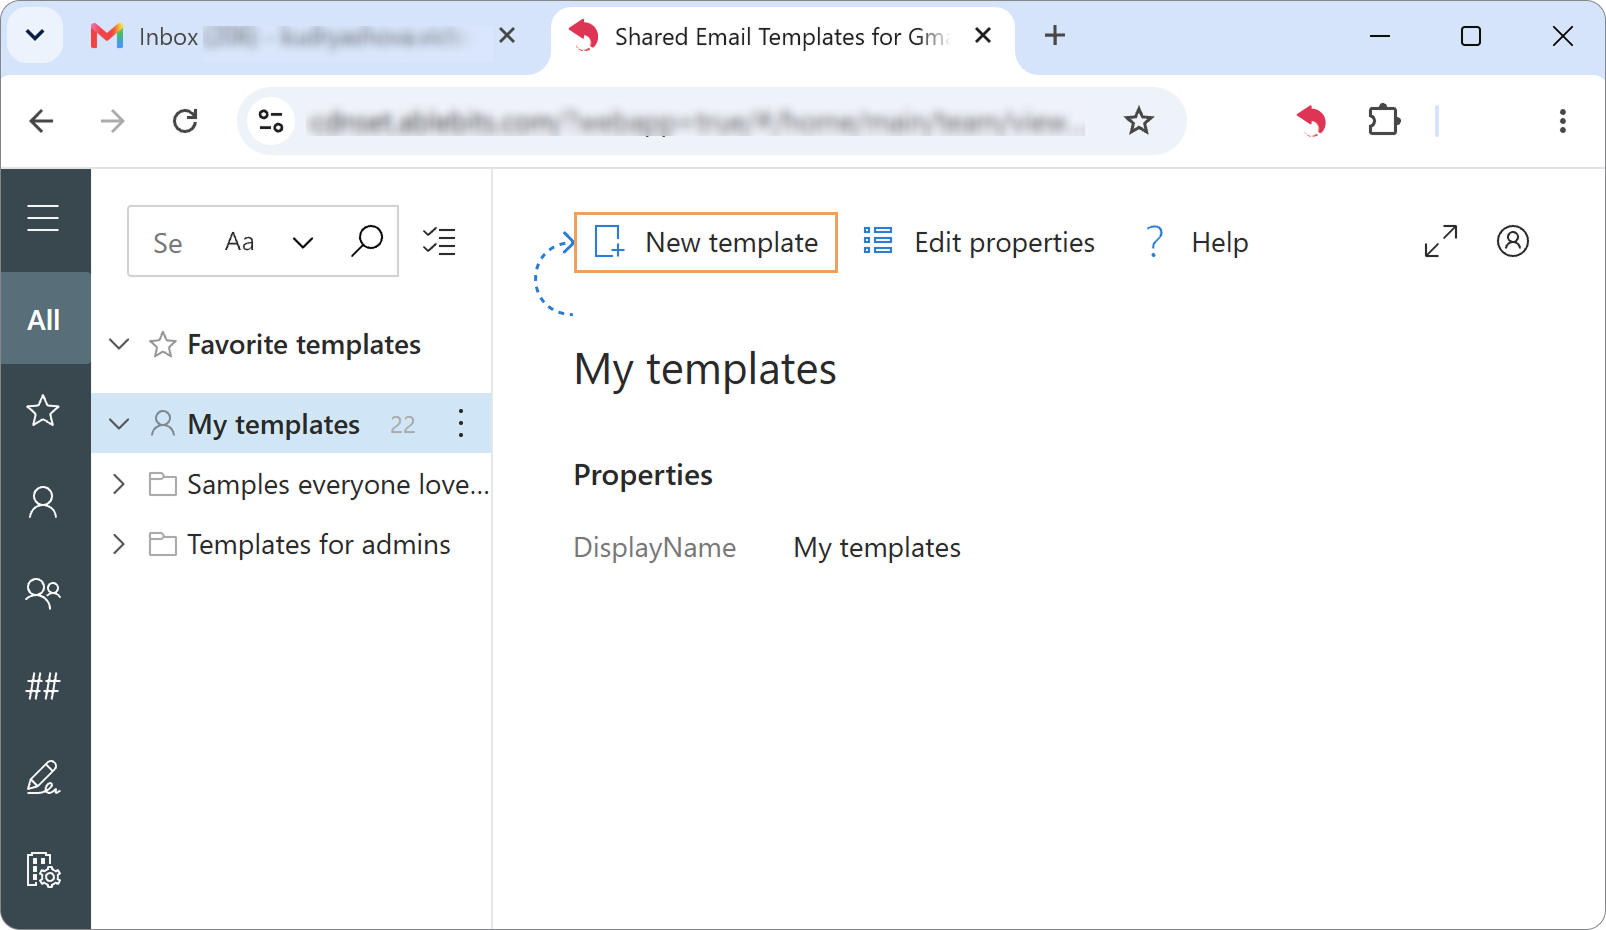
Once the main application opens in your browser, click New Template.
- 4.
The editor will open. Click Maximize in the bottom-right corner for a full view.
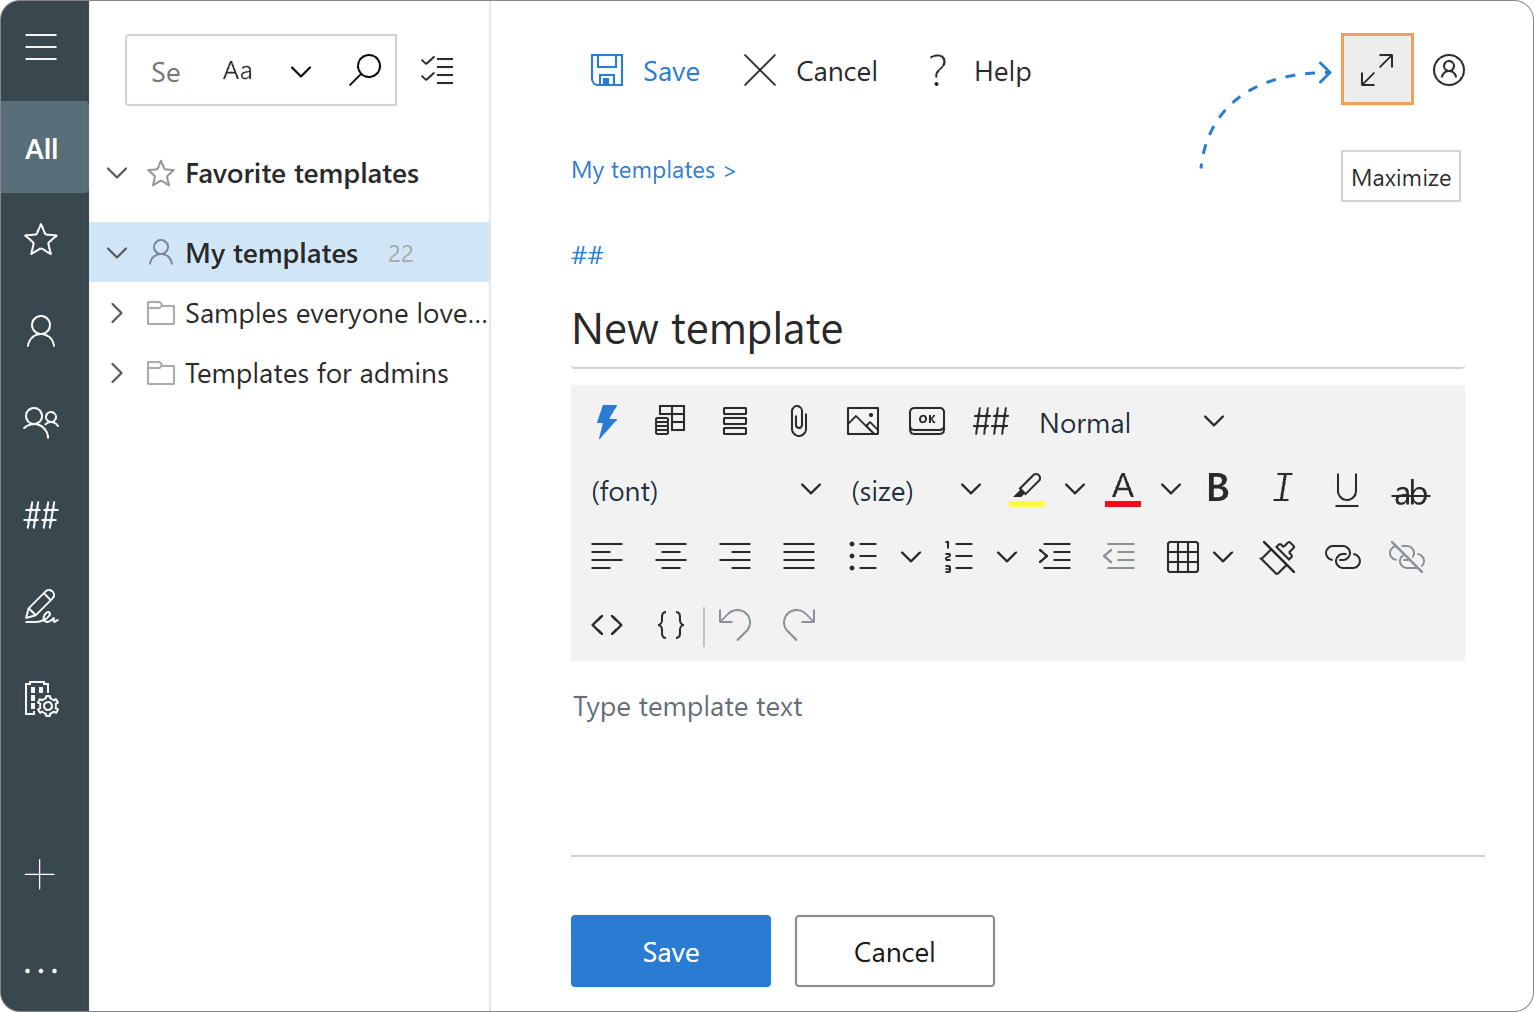
Note
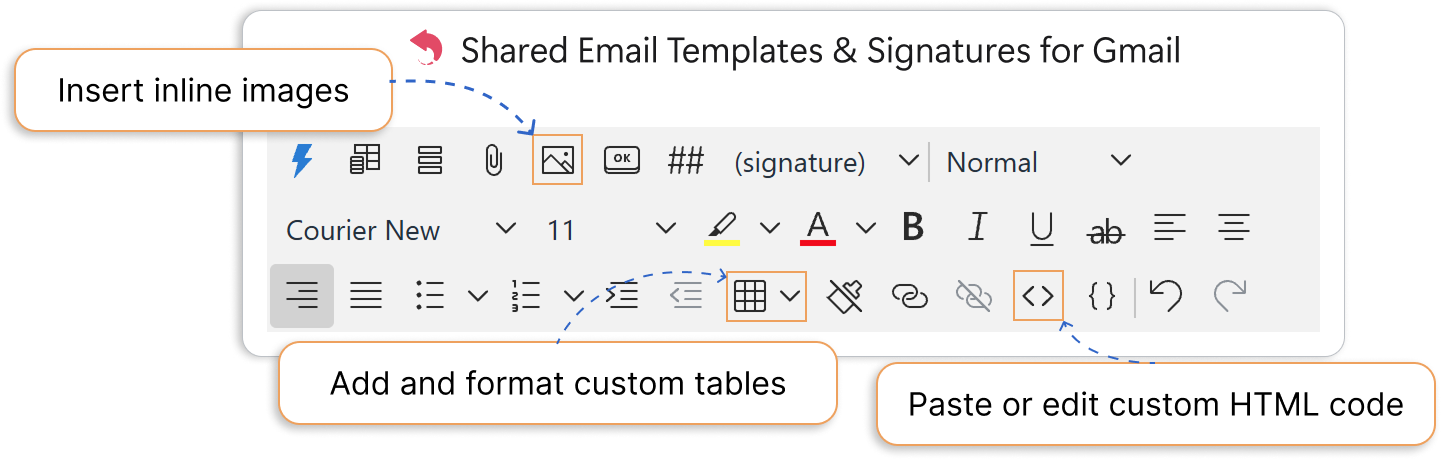
Take a moment to look at the editor toolbar! It goes far beyond standard Gmail formatting, giving you full control over custom tables, dynamic macros, interactive buttons, and raw HTML markup.
- 5.
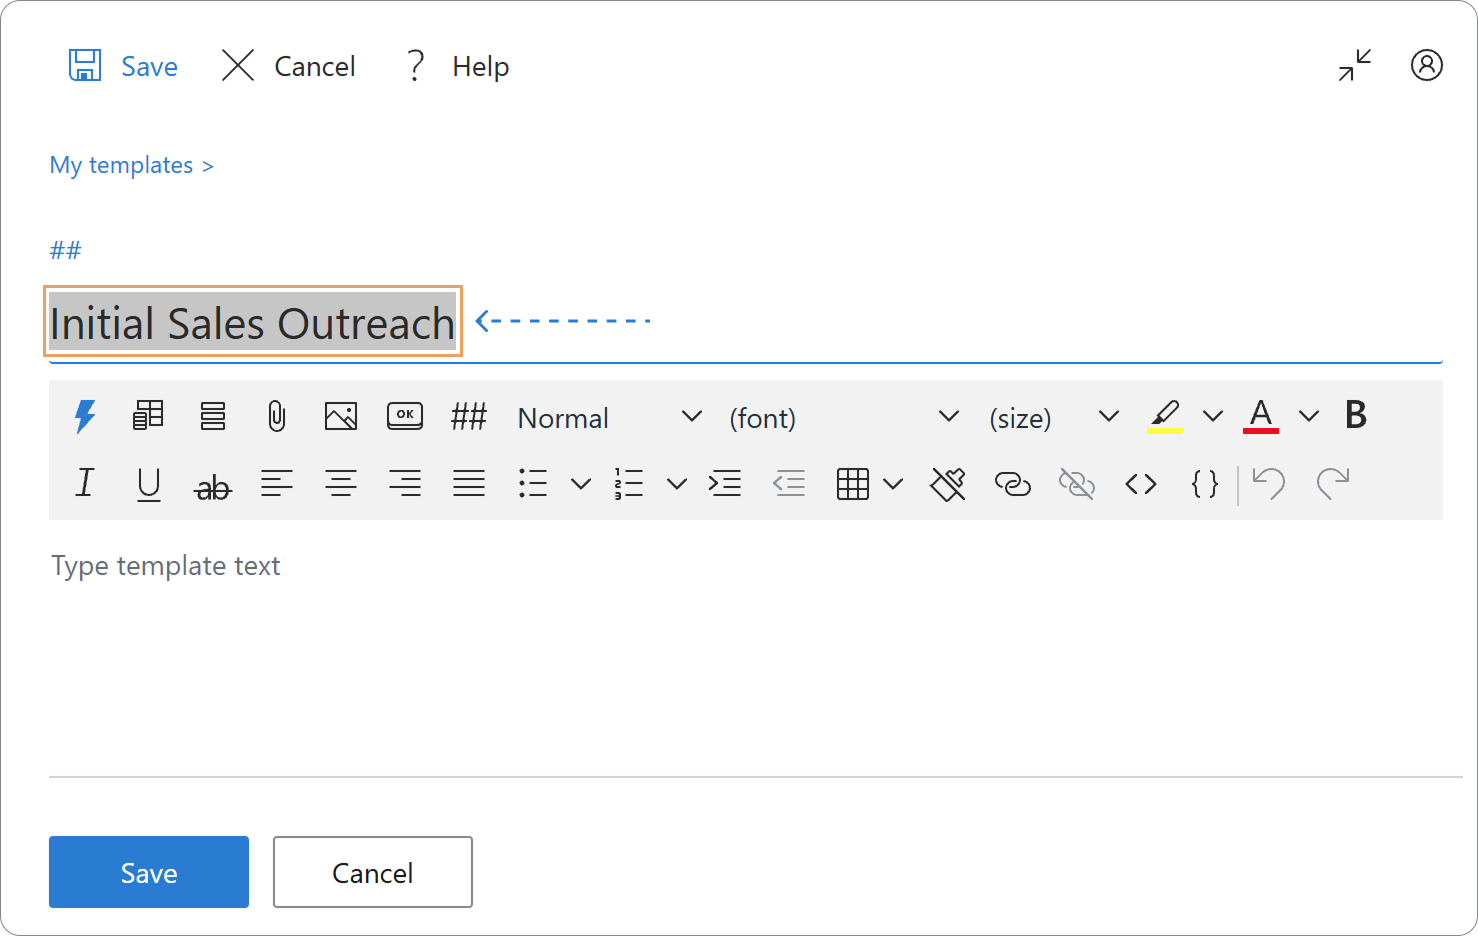
In the field at the top of the editor, give your template a clear title, for example: “Initial Sales Outreach”.
Step 2: Add a personalized greeting
- 1.
Click into the main text box of the editor and start your greeting, for example, “Hello ”.
- 2.
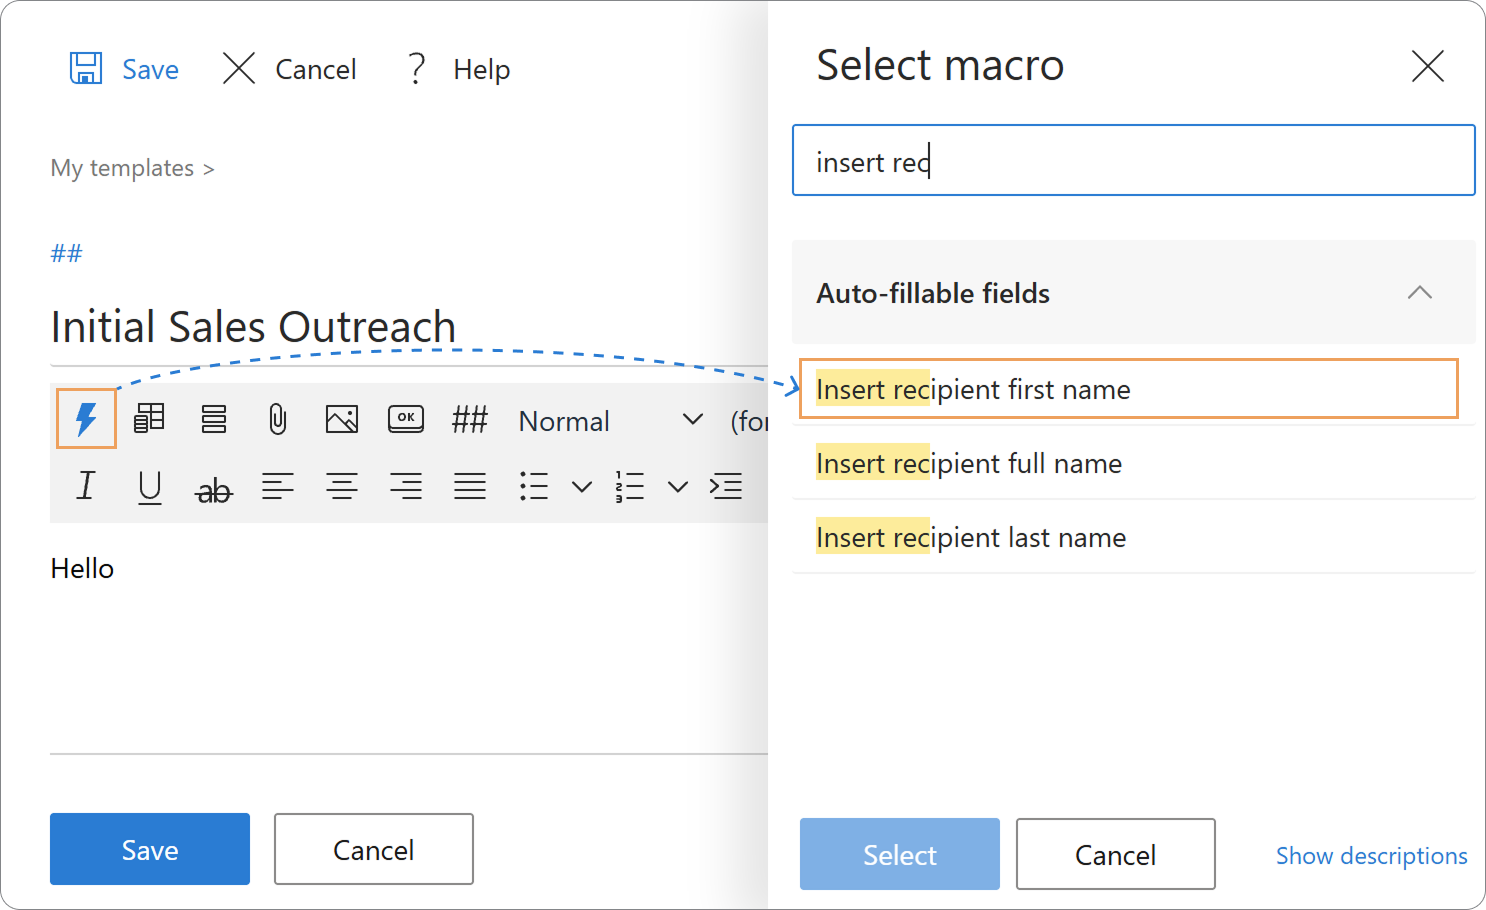
Click the Insert macro icon (blue lightning bolt) on the editor toolbar.
- 3.
Select Insert recipient first name.
Tip
Shared Email Templates has a huge library of macros. To find the right one quickly, just start typing “insert rec…” in the search field.
- 4.
Click Select.
Now, whenever you use your template, it will automatically pull the recipient’s actual name and generate a personalized greeting like “Hello Sarah”.
Tip
You can also try using the specialized Insert greeting macro, which lets you configure greetings for multiple recipients and set a fallback phrase just in case the recipient’s name is missing.
Step 3: Insert a borderless table
To showcase our product bundles side-by-side without making the email too long, we’ll organize them using a simple grid:
- 1.
Type out your intro text right below the greeting.
- 2.
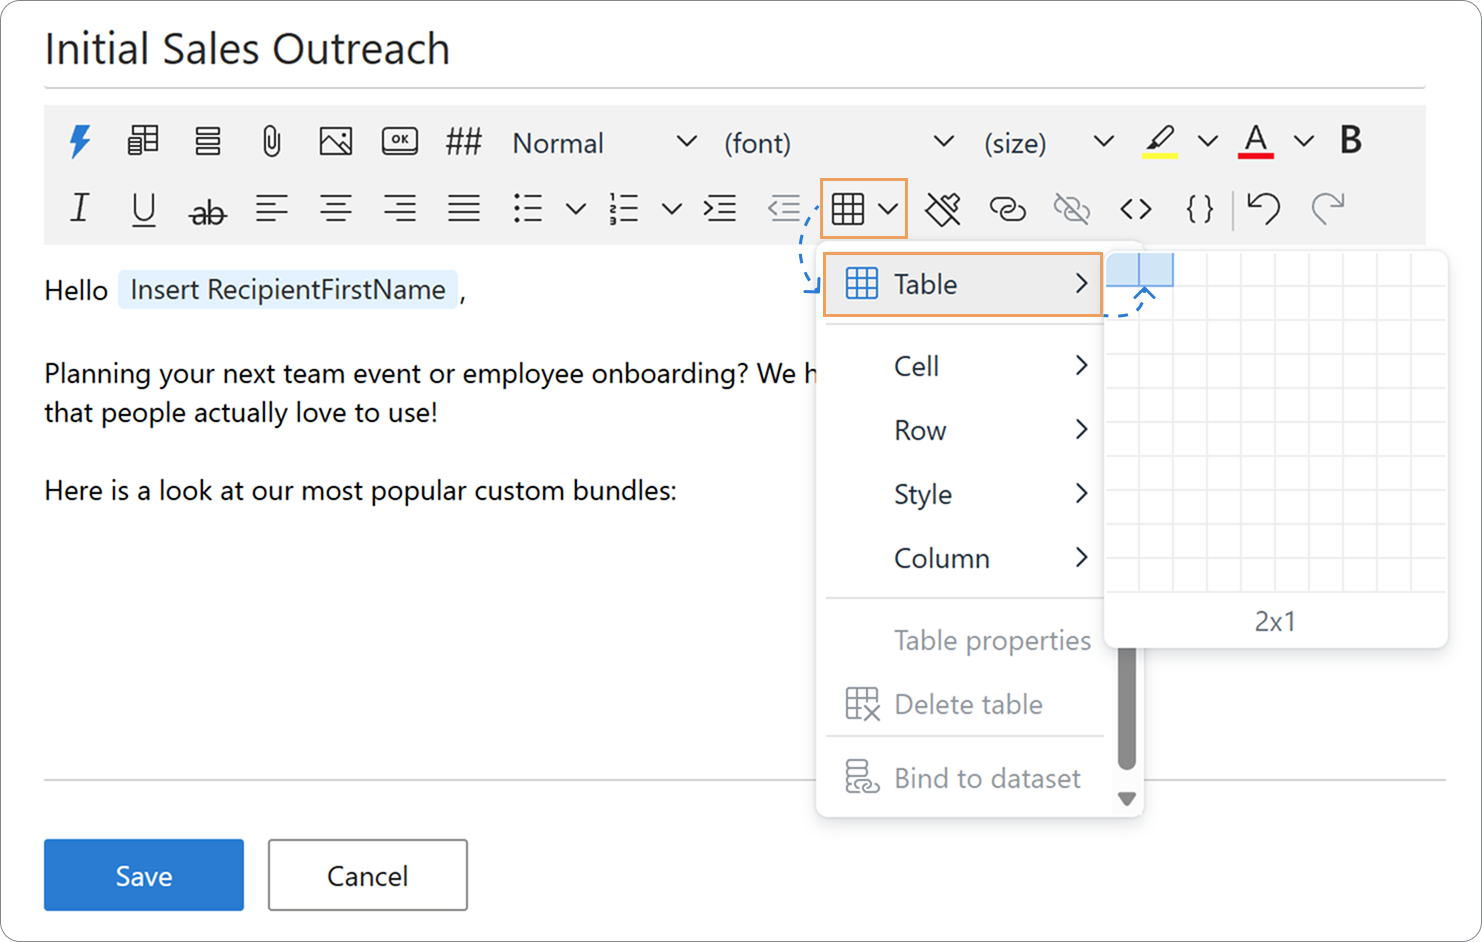
Position your cursor where you want the products to appear, click the Table icon on the editor toolbar, and select a 2 × 1 grid.
- 3.
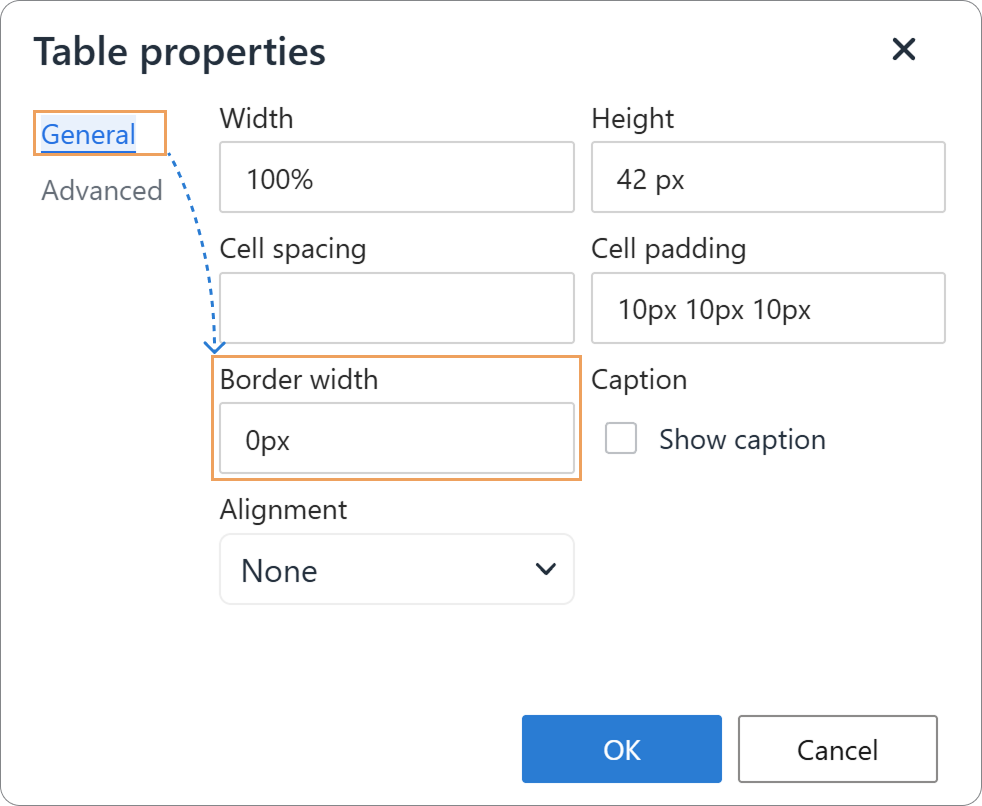
To make the grid lines completely invisible to recipients, right-click inside the table and select Table properties.
- 4.
On the General tab, set Border width to 0 px.
- 5.
Click Save.
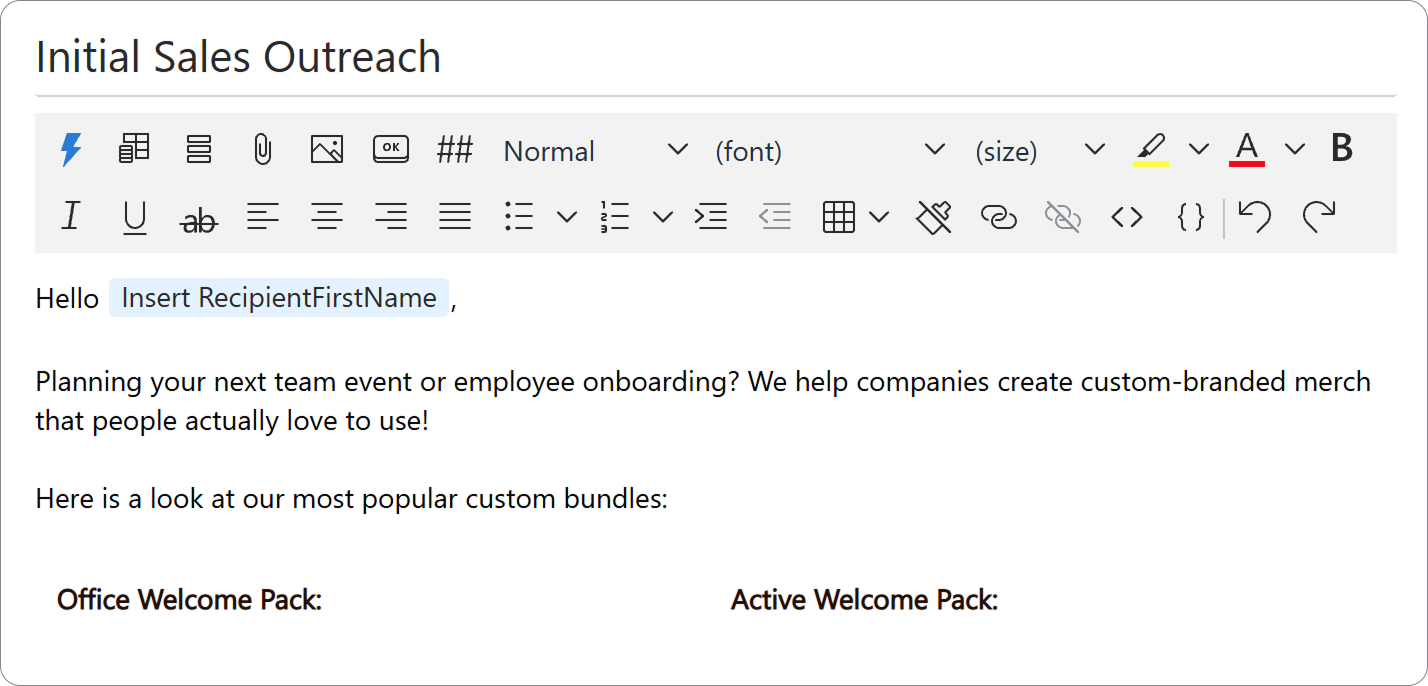
Now you have a clean, borderless layout! You can insert your product titles into each cell side by side.
Step 4: Add images
Now let’s add image previews to make our proposal visually appealing:
- 1.
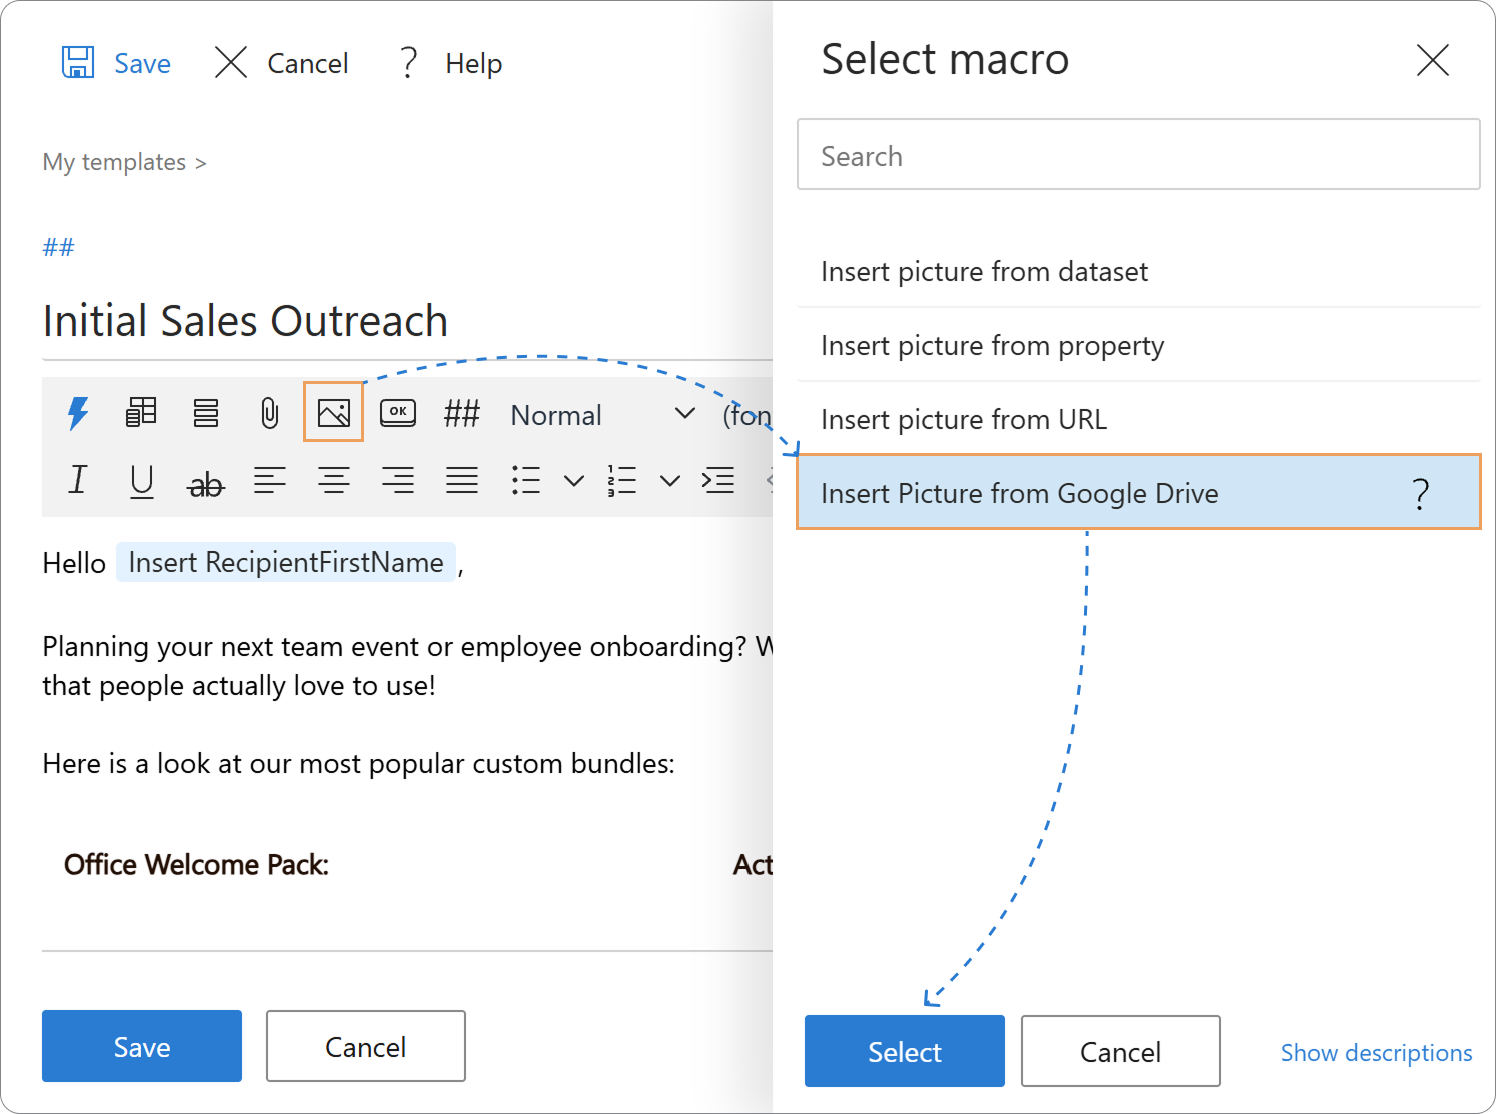
Place your cursor inside the first table cell and click the Insert picture icon on the editor toolbar.
- 2.
Select Insert Picture from Google Drive.
Note
You can also insert pictures from a dataset, property, or direct URL, but we’ll explore those advanced options later.
- 3.
Locate your image using the search bar at the bottom and click Select.
- 4.
In the pop-up window, adjust the image dimensions (for example, scale it down to 20% for a neat fit).
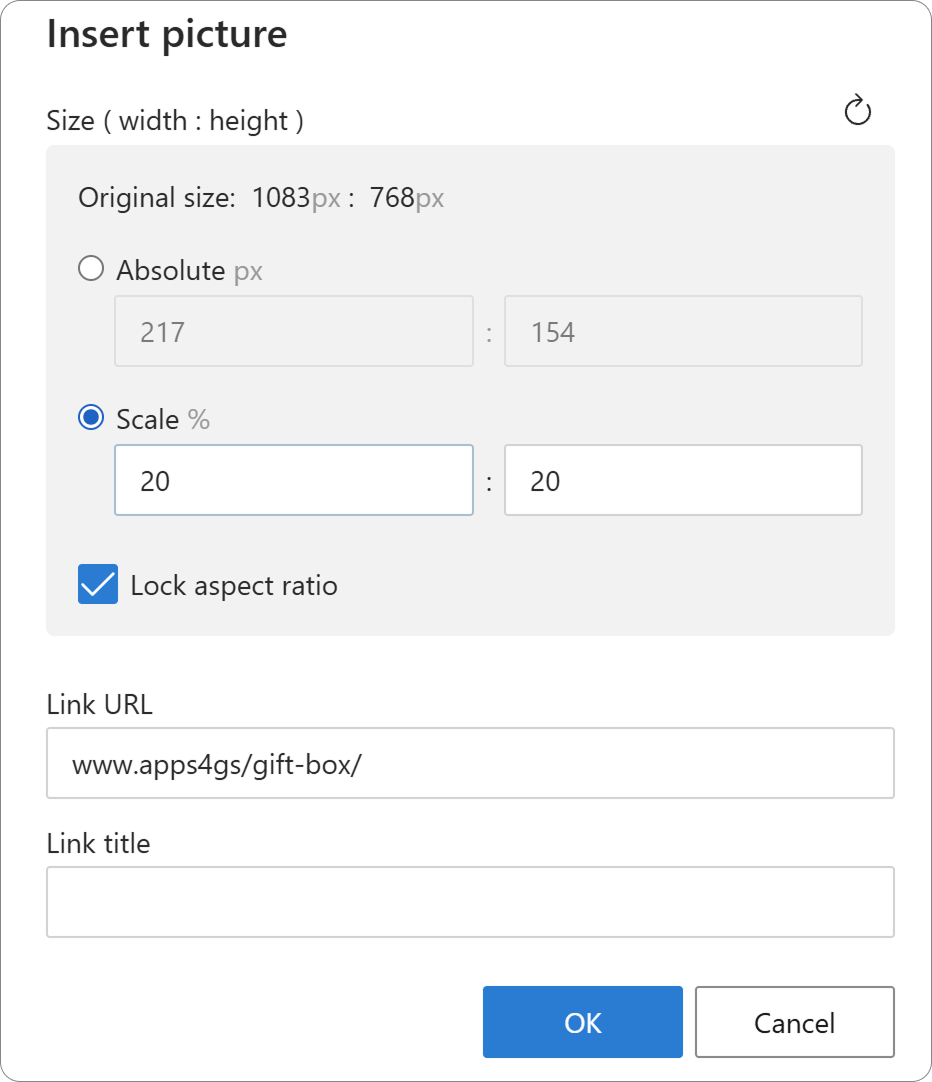
- 5.
Click OK.
- 6.
Repeat the exact same steps to add the second image into the adjacent table cell.
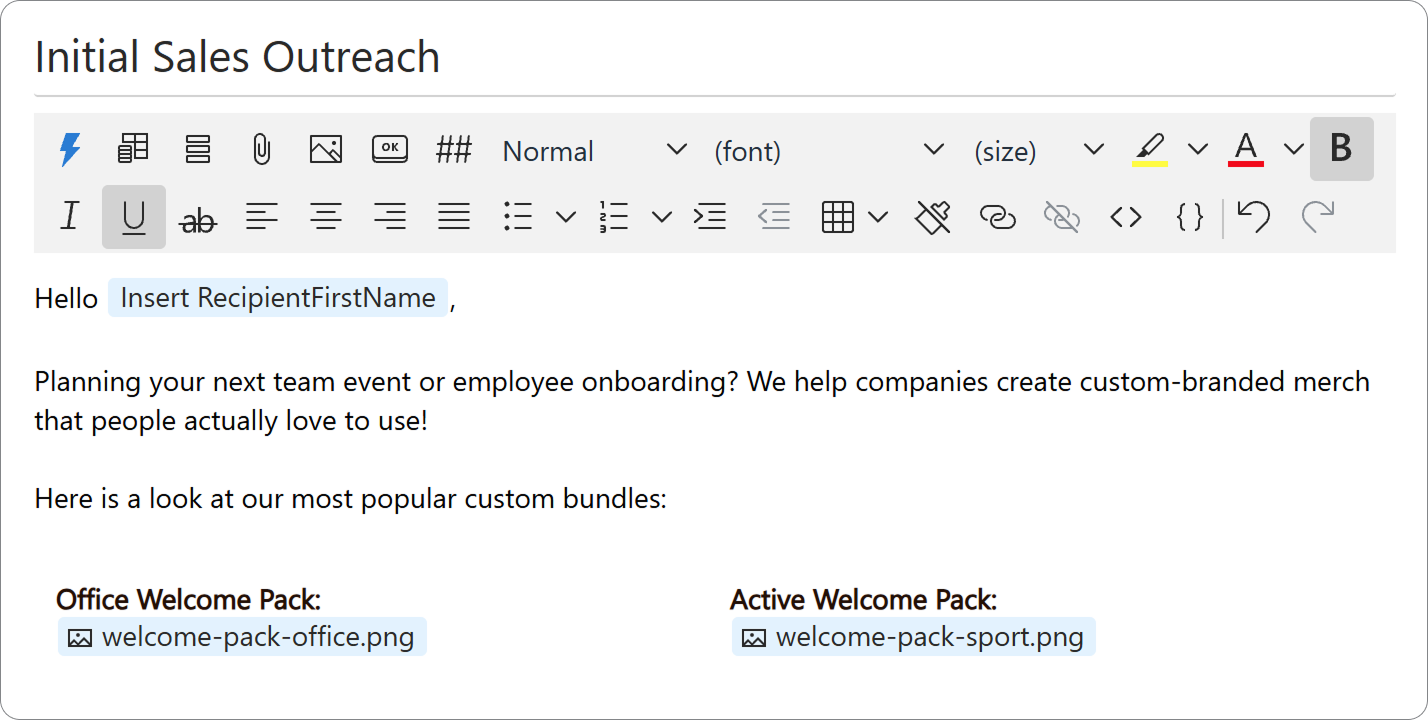
That’s it! From now on, these images will be embedded directly into your email drafts whenever you insert this template.
Step 5: Add a CTA button
- 1.
Place your cursor inside the message where you want the button to appear.
- 2.
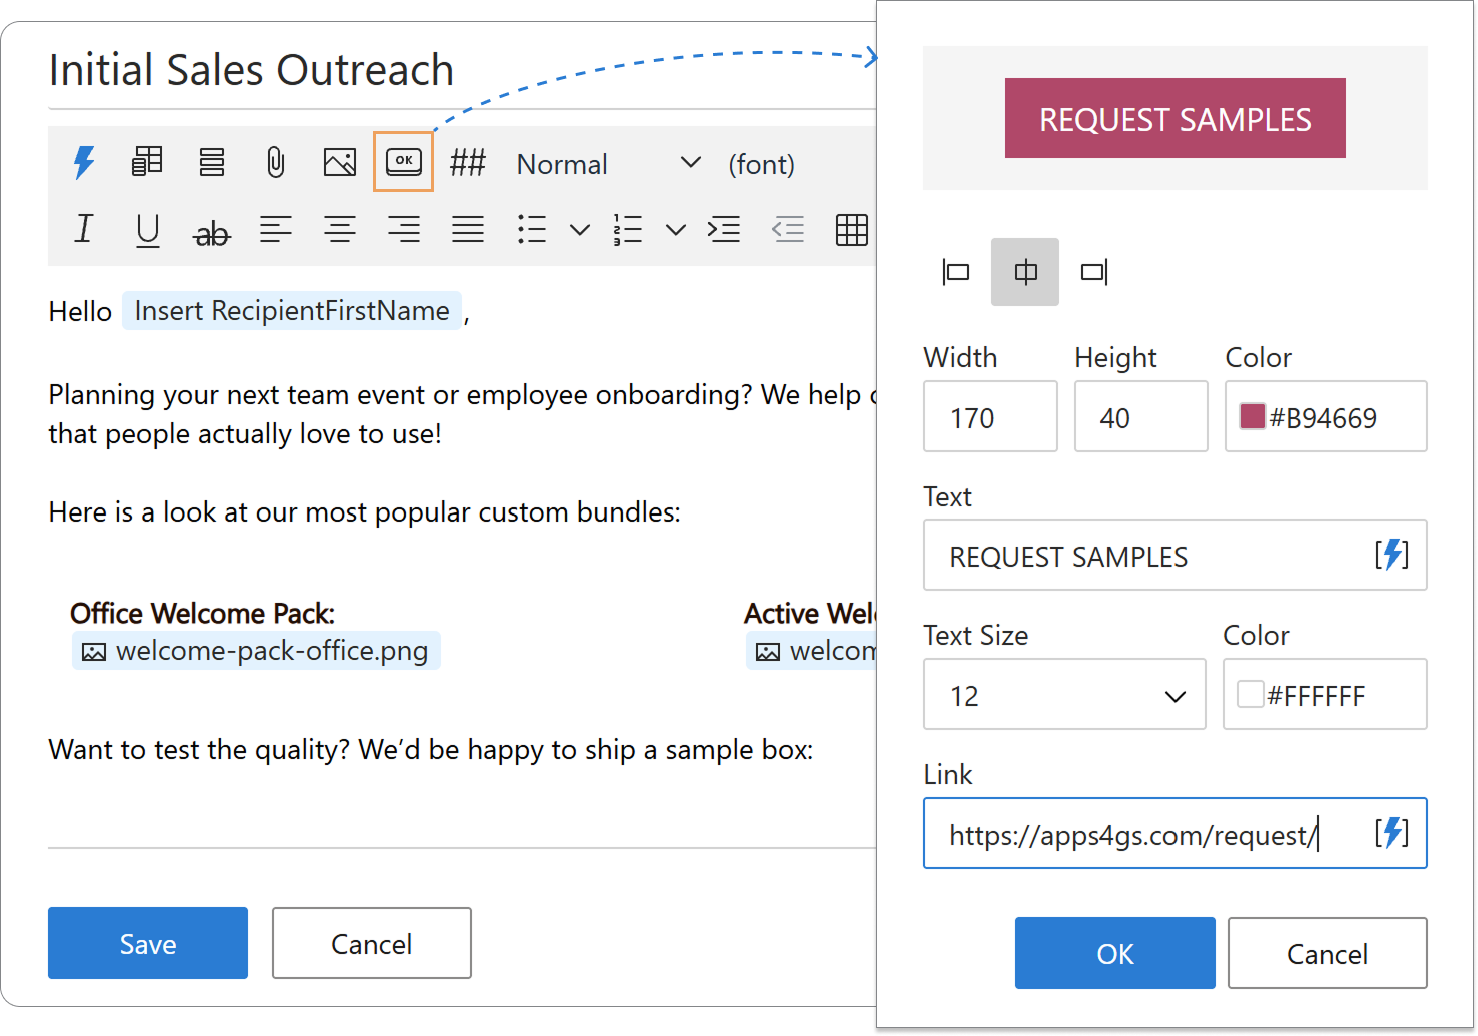
Click the Insert Button icon on the toolbar.
- 3.
Label it as you like (e.g., “REQUEST SAMPLES”), pick a nice accent color, and paste your link.
Step 6: Attach your presentation
- 1.
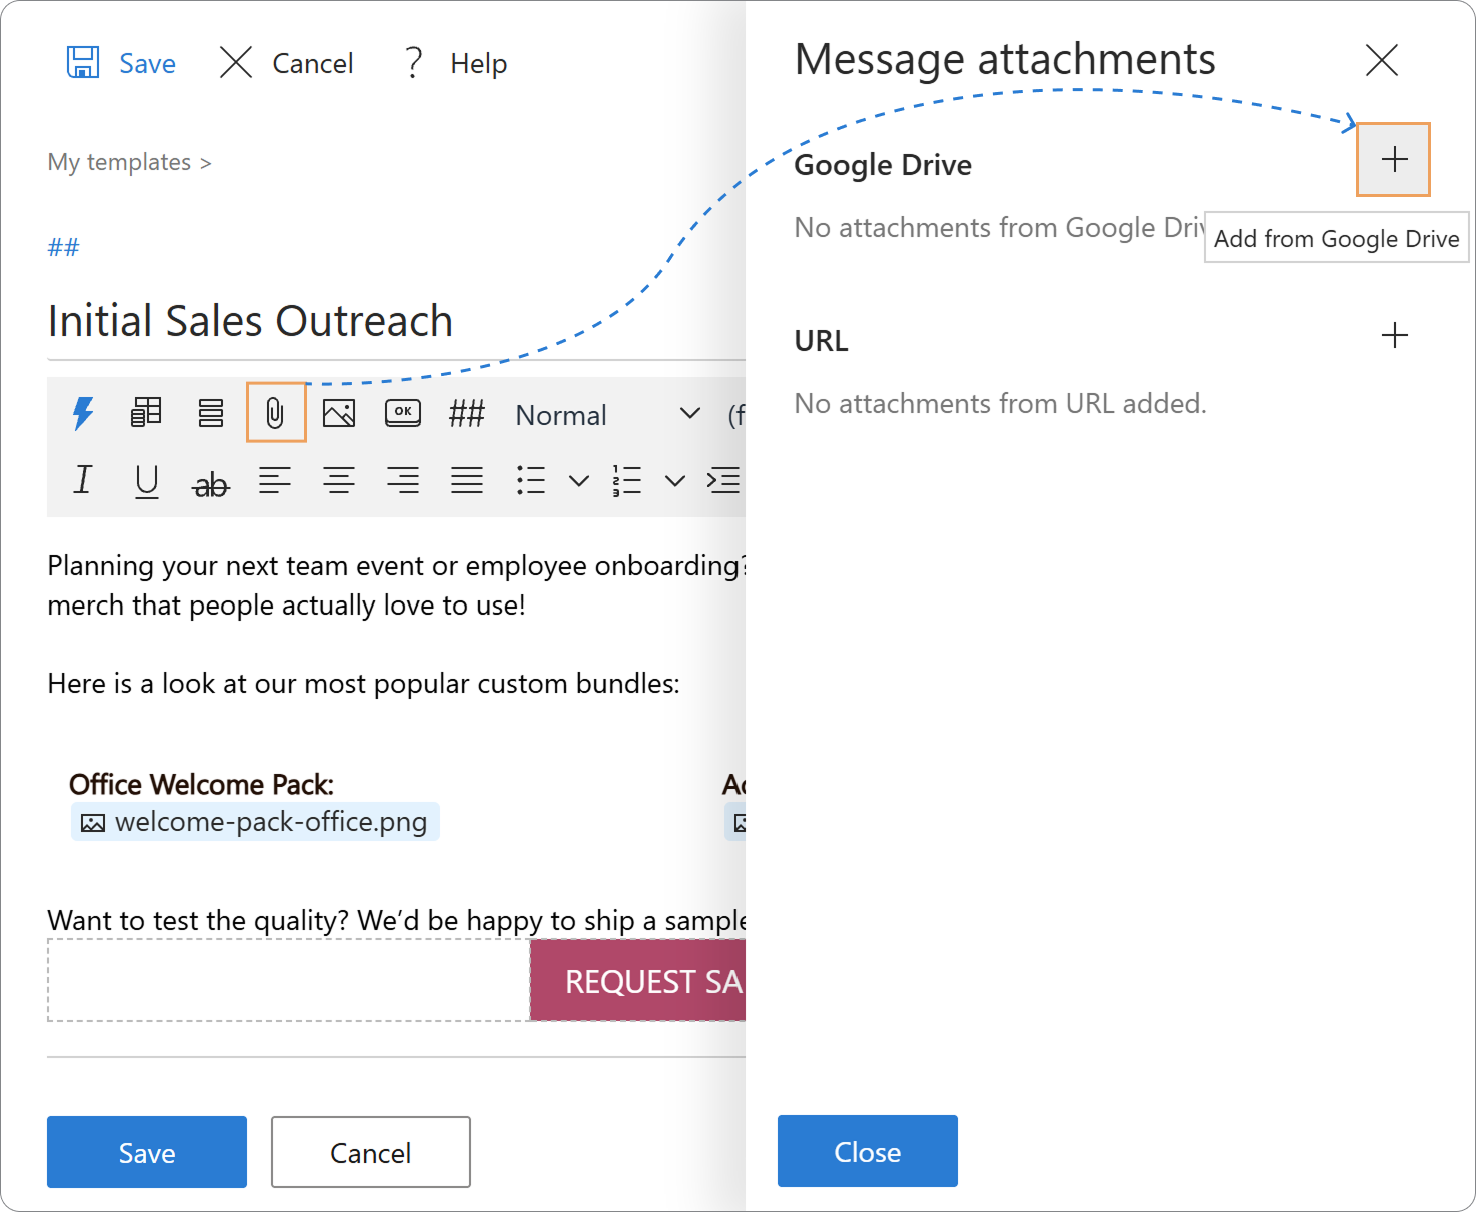
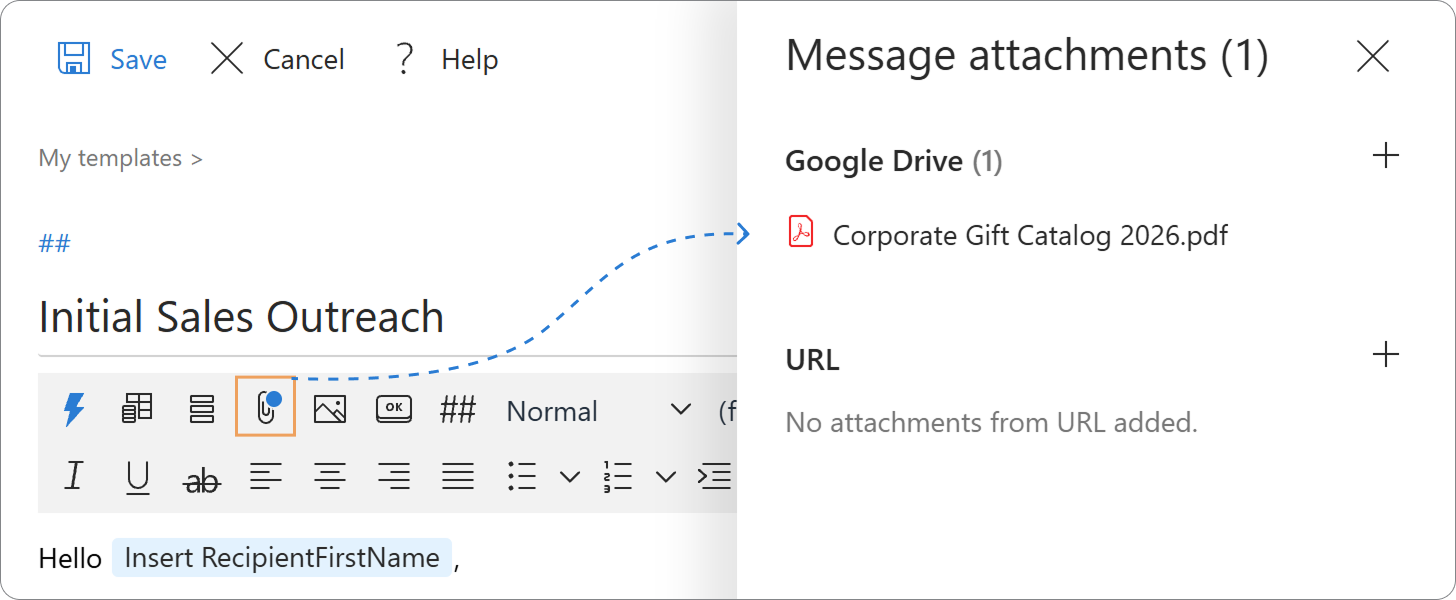
Click the paperclip icon inside the template editor.
- 2.
Click the plus icon (+) next to Google Drive.
- 3.
Select your company’s presentation PDF.
Once the PDF is attached, this file will automatically show up in your email draft every single time you insert the template.
Tip
You can easily check if a template has any attached files just by looking at the paperclip icon. A blue dot next to the paperclip indicates that attachments are present. Clicking the paperclip icon will open a window showing the full list of attached files, where you can view or manage them.
Step 7: Add a closing line
- 1.
Place your cursor at the very bottom of your email text and type a sign-off, such as “Best regards,”.
- 2.
Click the Insert macro icon on the toolbar and select Insert sender full name.
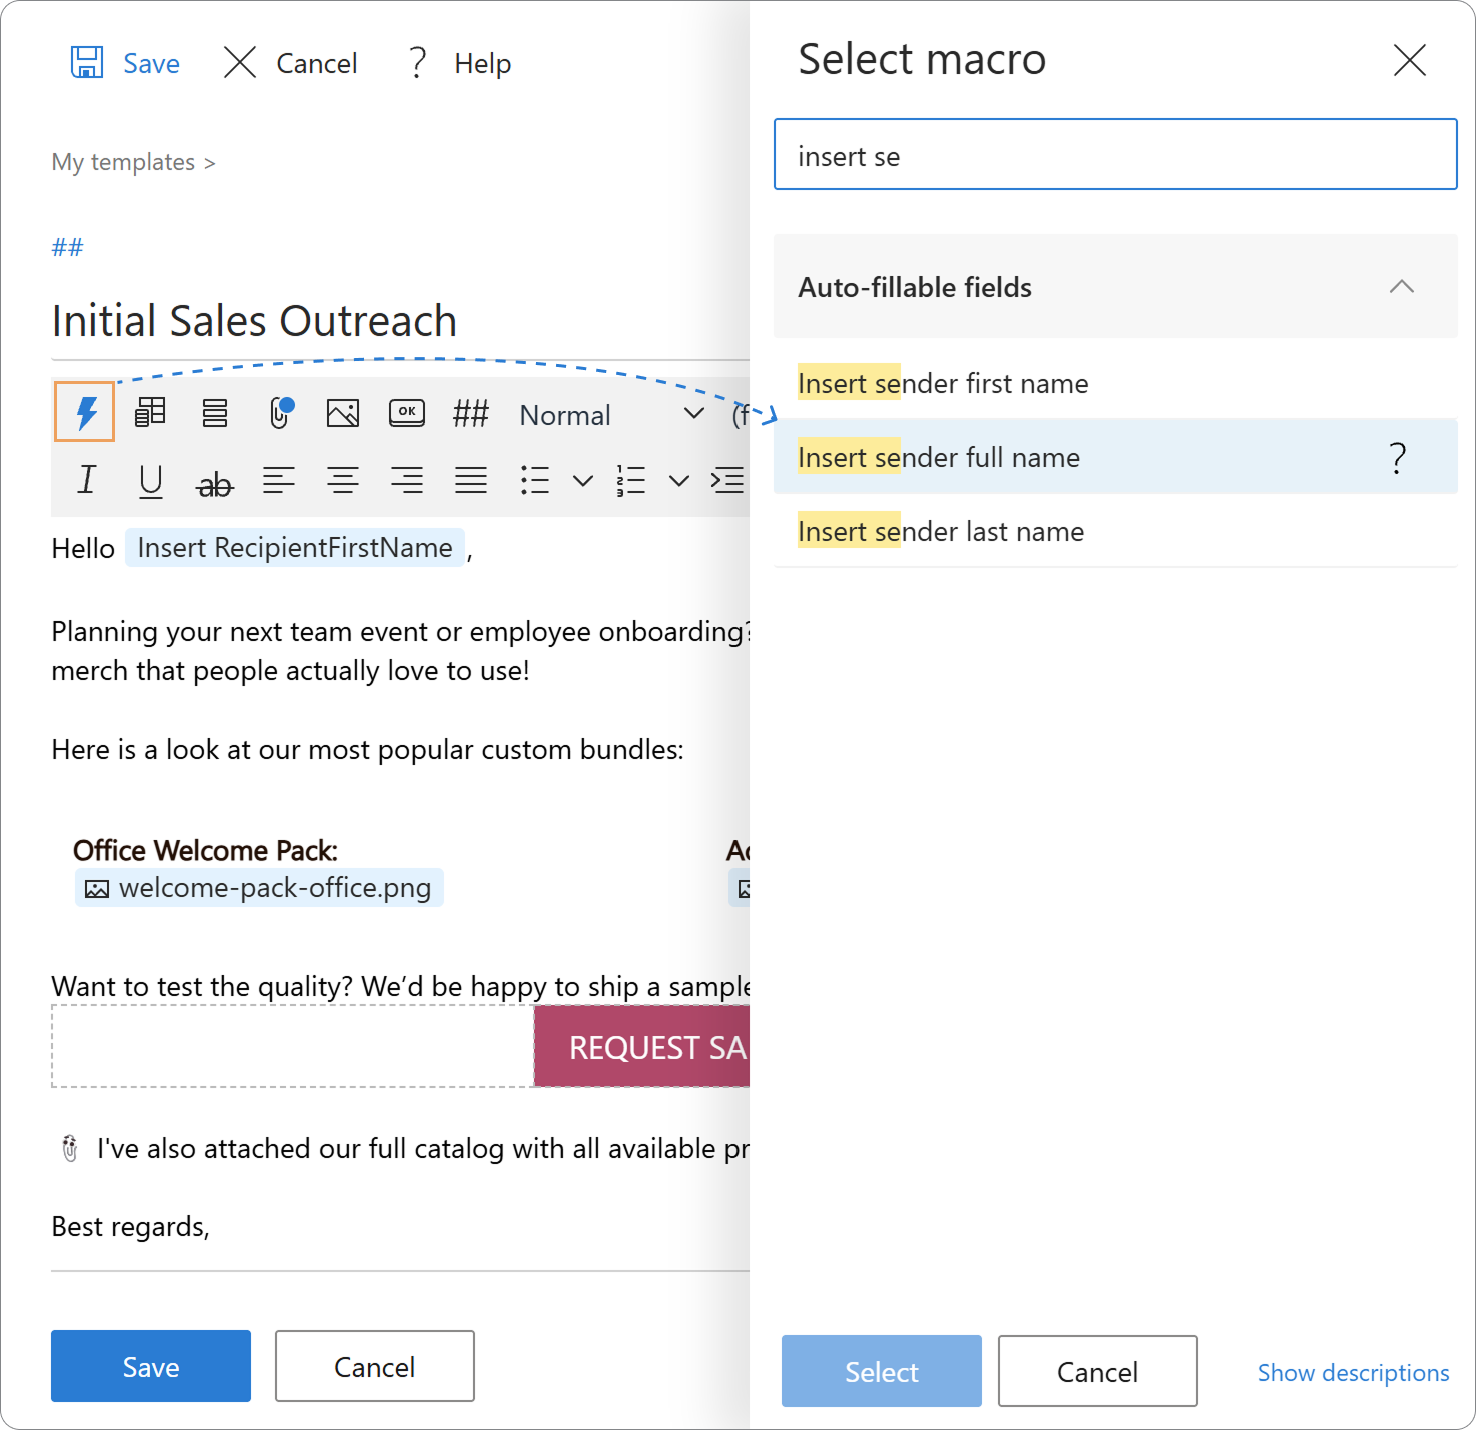
Now, the template will automatically pull your full name right after the sign-off.
Step 8: Preset email message fields: Subject, Cc/Bcc
To streamline sending even further, you can preconfigure standard email fields so you don’t have to fill them out manually every time:
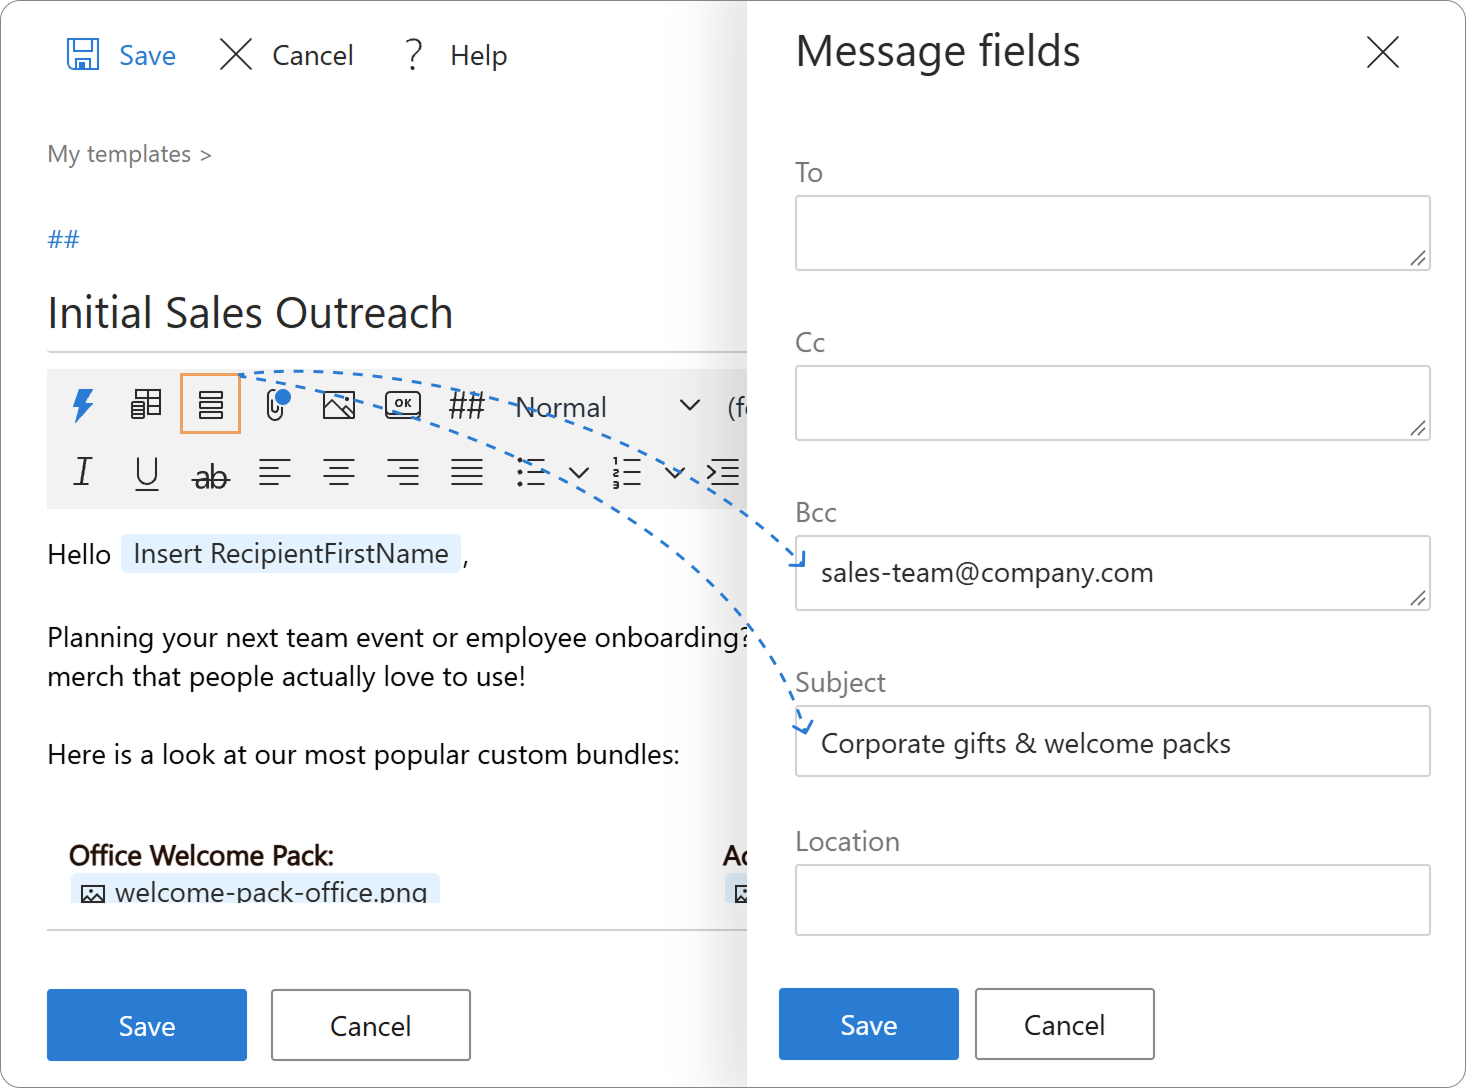
- 1.On the editor toolbar, click the Message fields icon.
- 2.In the pop-up window:
- Subject: Type a default subject line, such as “Corporate gifts & welcome packs”.
- Cc / Bcc: Add standard team addresses (e.g., put your sales manager in Bcc to track outreach).
- To: (Optional) Enter a fixed recipient address if this template is always sent to a specific person or team.
- 3.Save your settings.
Tip
Just like with attachments, you can quickly tell if a template has preset message fields by looking at the toolbar. A blue dot next to the Message fields icon indicates that fields like Subject, Cc, or Bcc are pre-filled.
Now, whenever you insert the template, the subject line and recipient fields will automatically autofill right inside your Gmail compose window!
Tip
Want a dynamic subject line that automatically inserts the recipient’s name? You can easily automate this using the Fill Subject macro combined with the Insert recipient first name macro. We’ll cover this exact case in our dedicated article on macros 😉.
Step 9: Save your template
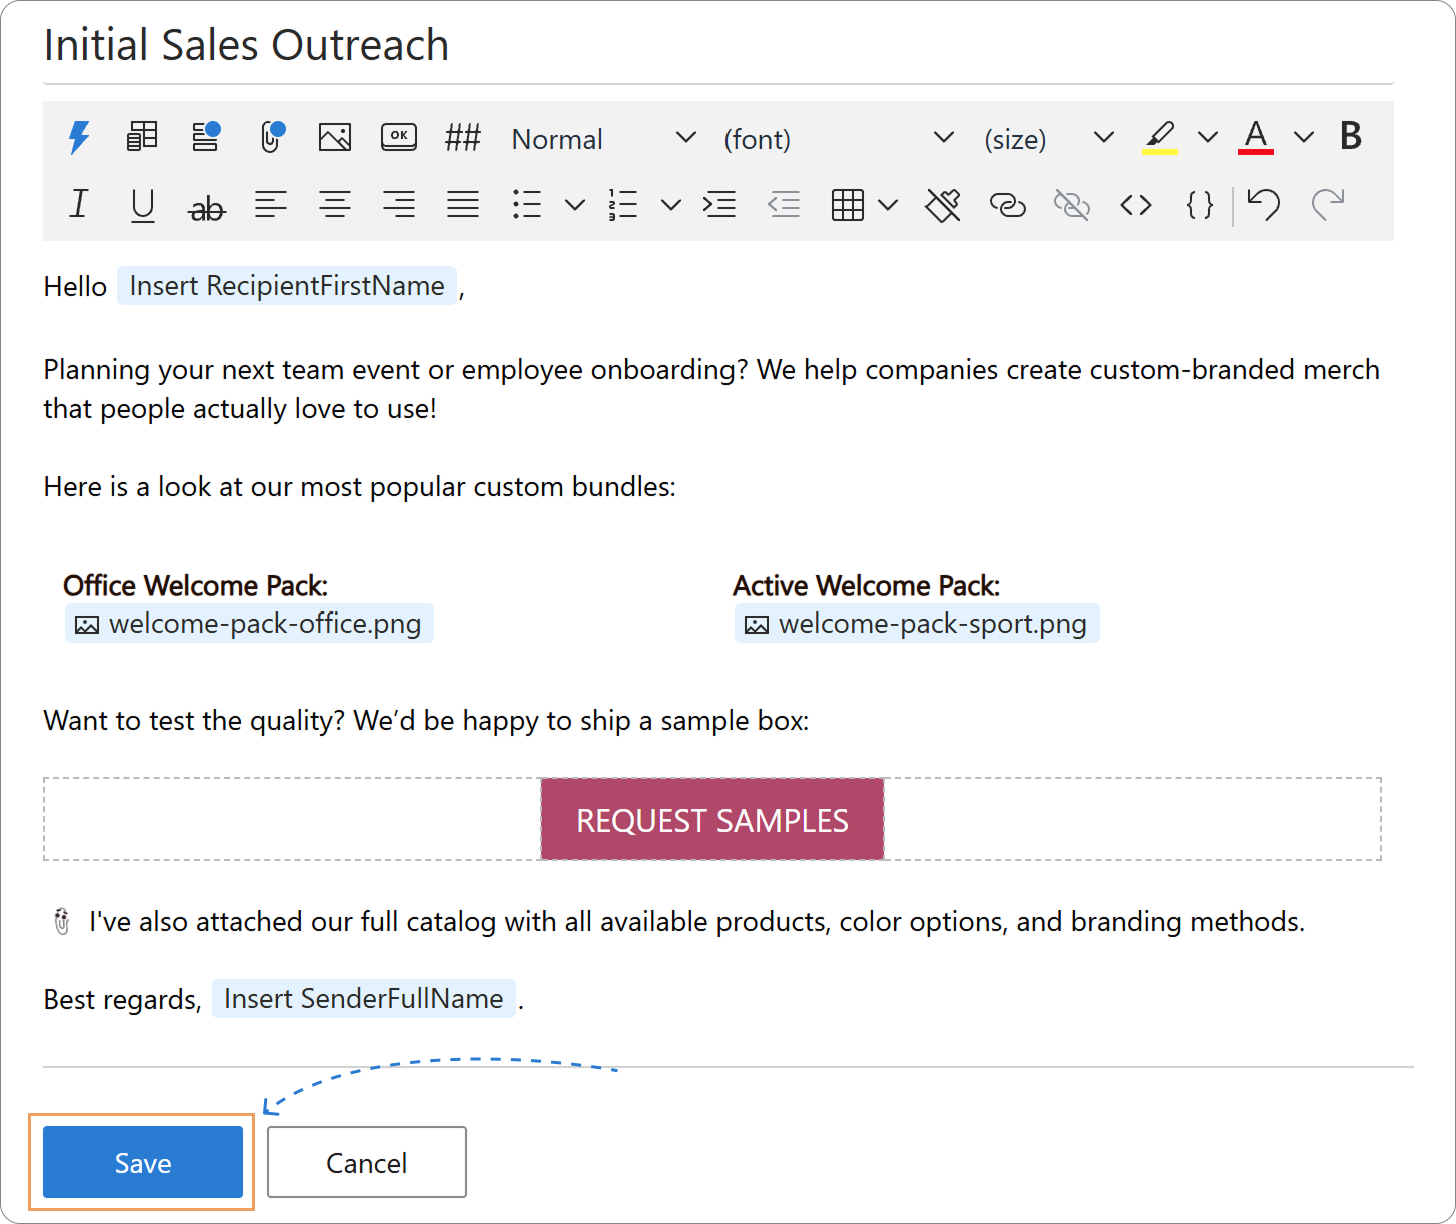
Click the Save button at the bottom of the editor.
How to insert a saved template into an email
Once your template is saved, using it takes just a couple of clicks:
- 1.
Open the add-on: In Gmail, open the Shared Email Templates sidebar on the right.
- 2.
Find your template: In the sidebar, locate your “Initial Sales Outreach” template.
- 3.
Insert it: Hover over the template and click Insert next to its name.
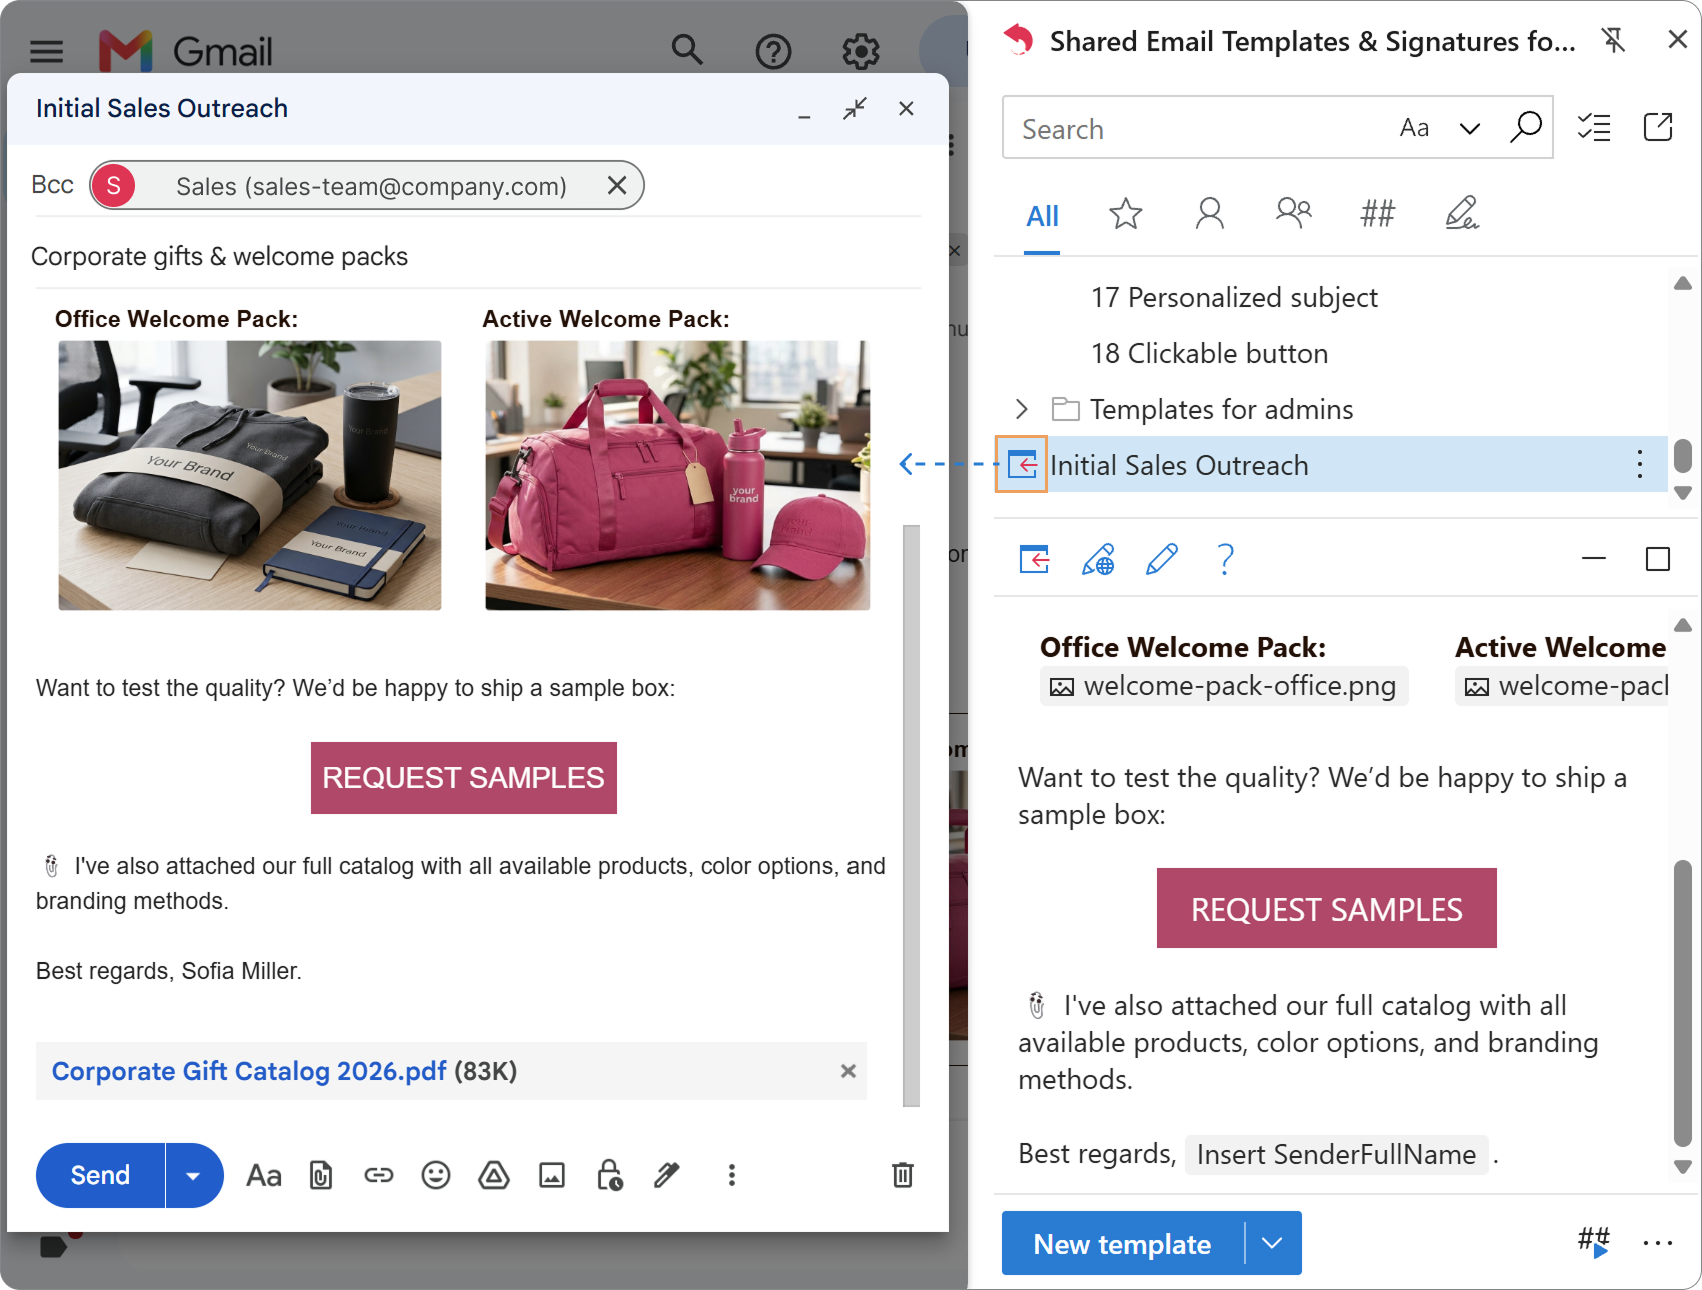
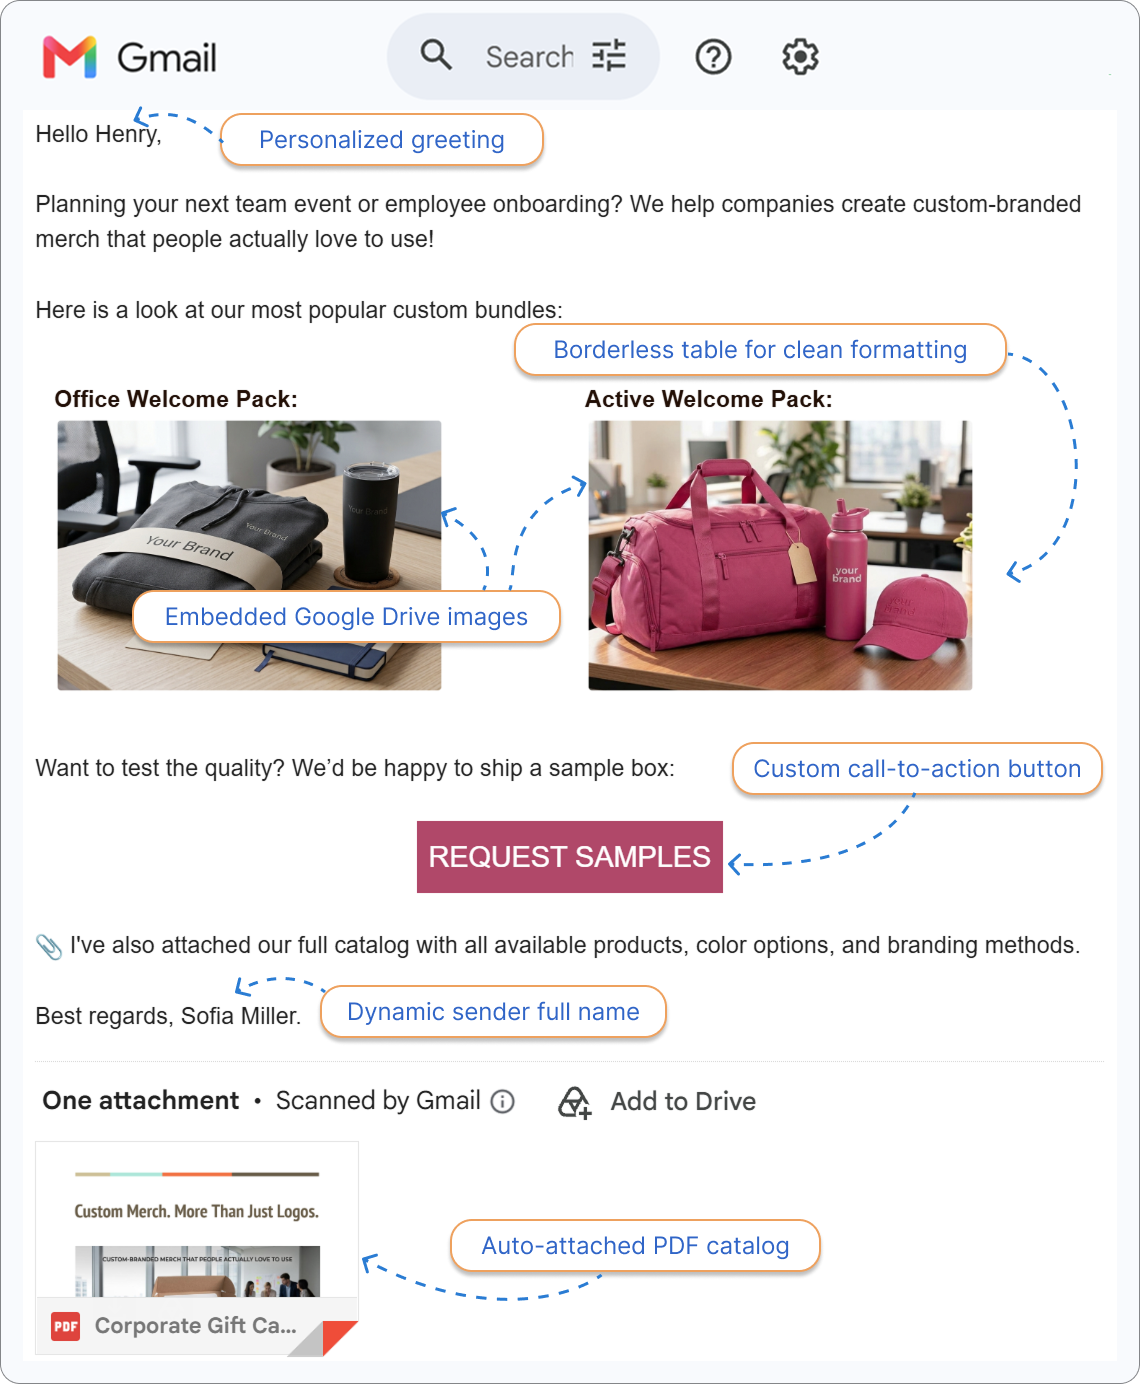
That’s it! In less than two seconds, the Shared Email Templates add-on automatically:
- Fills in a personalized greeting.
- Populates the formatted email body complete with the borderless table, images, and CTA button.
- Attaches your catalog PDF directly to the email draft.
All you need to do is add your recipients and hit Send.
How to edit an existing template
When your message needs a refresh, you don’t have to rebuild it from scratch.
Here’s how to update your template in Gmail:
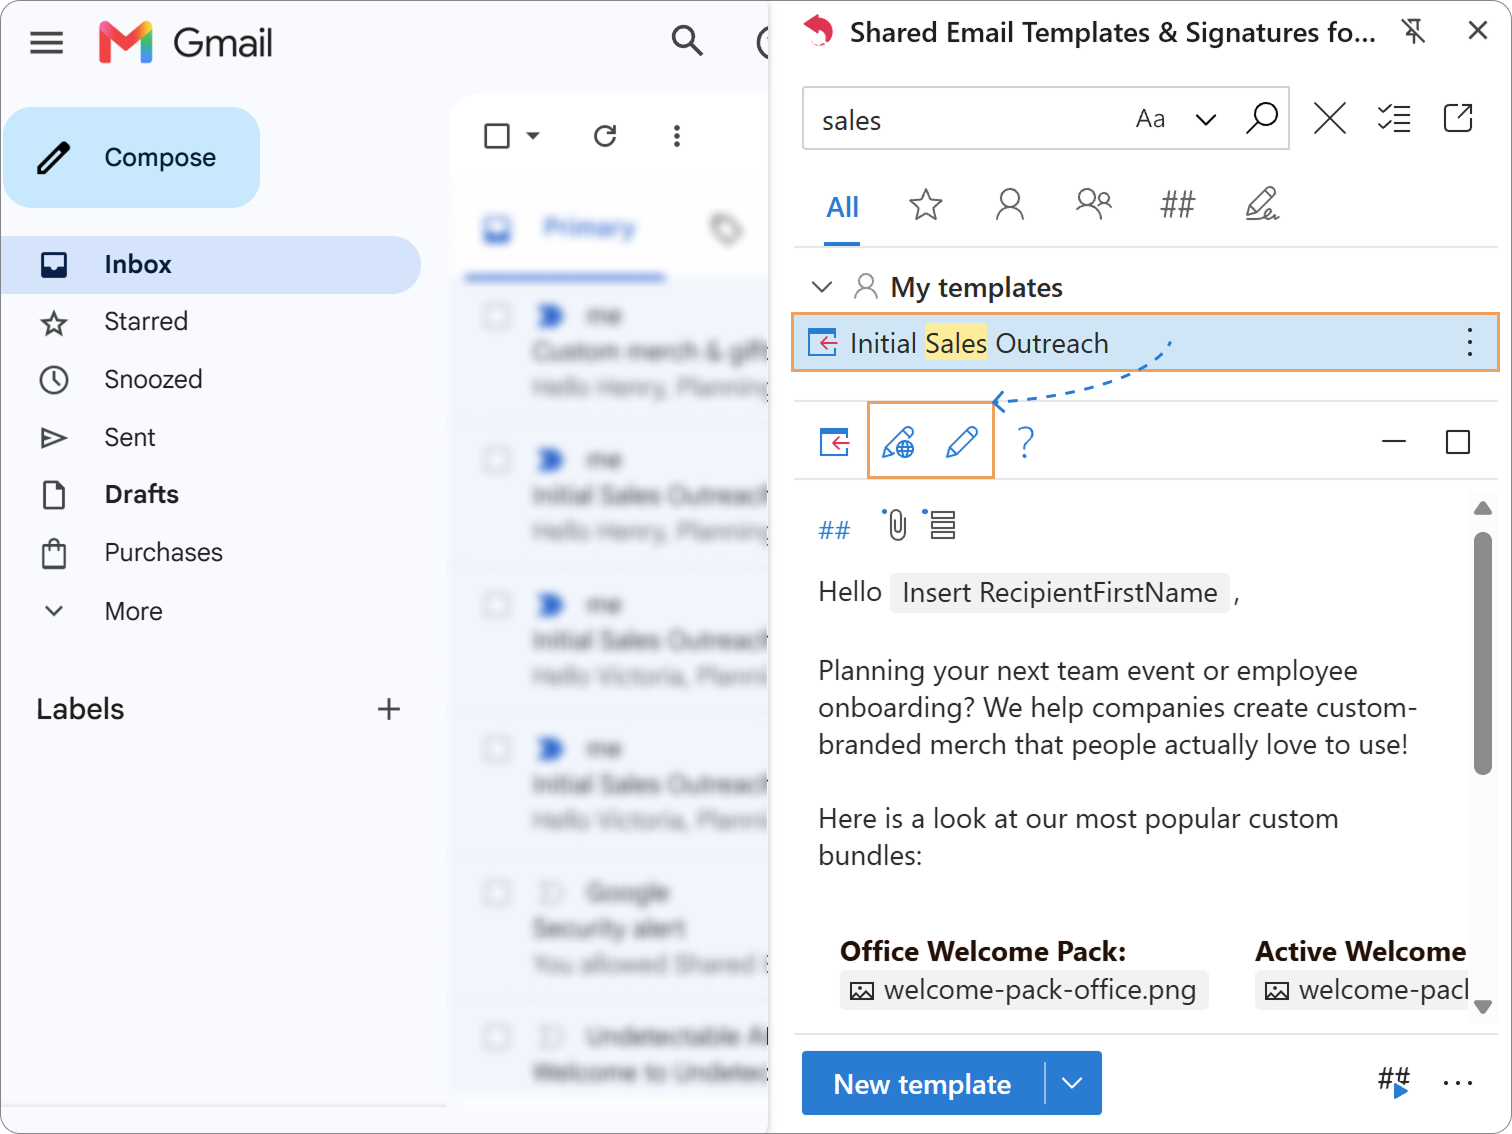
- 1.Locate your template: Find it in the Shared Email Templates sidebar.
Tip
Use the search bar at the top to quickly filter through your templates.
- 2.
Open the editor: Hover over the template name and click the Pencil icon (or click Edit in browser if you want a larger view).
- 3.
Make your edits: Update the text, adjust button styling, or swap out attached files.
Tip
To customize button styling or tweak table borders, switch to the HTML view by clicking the View HTML button.
- 4.
Save your updates: Click Save.
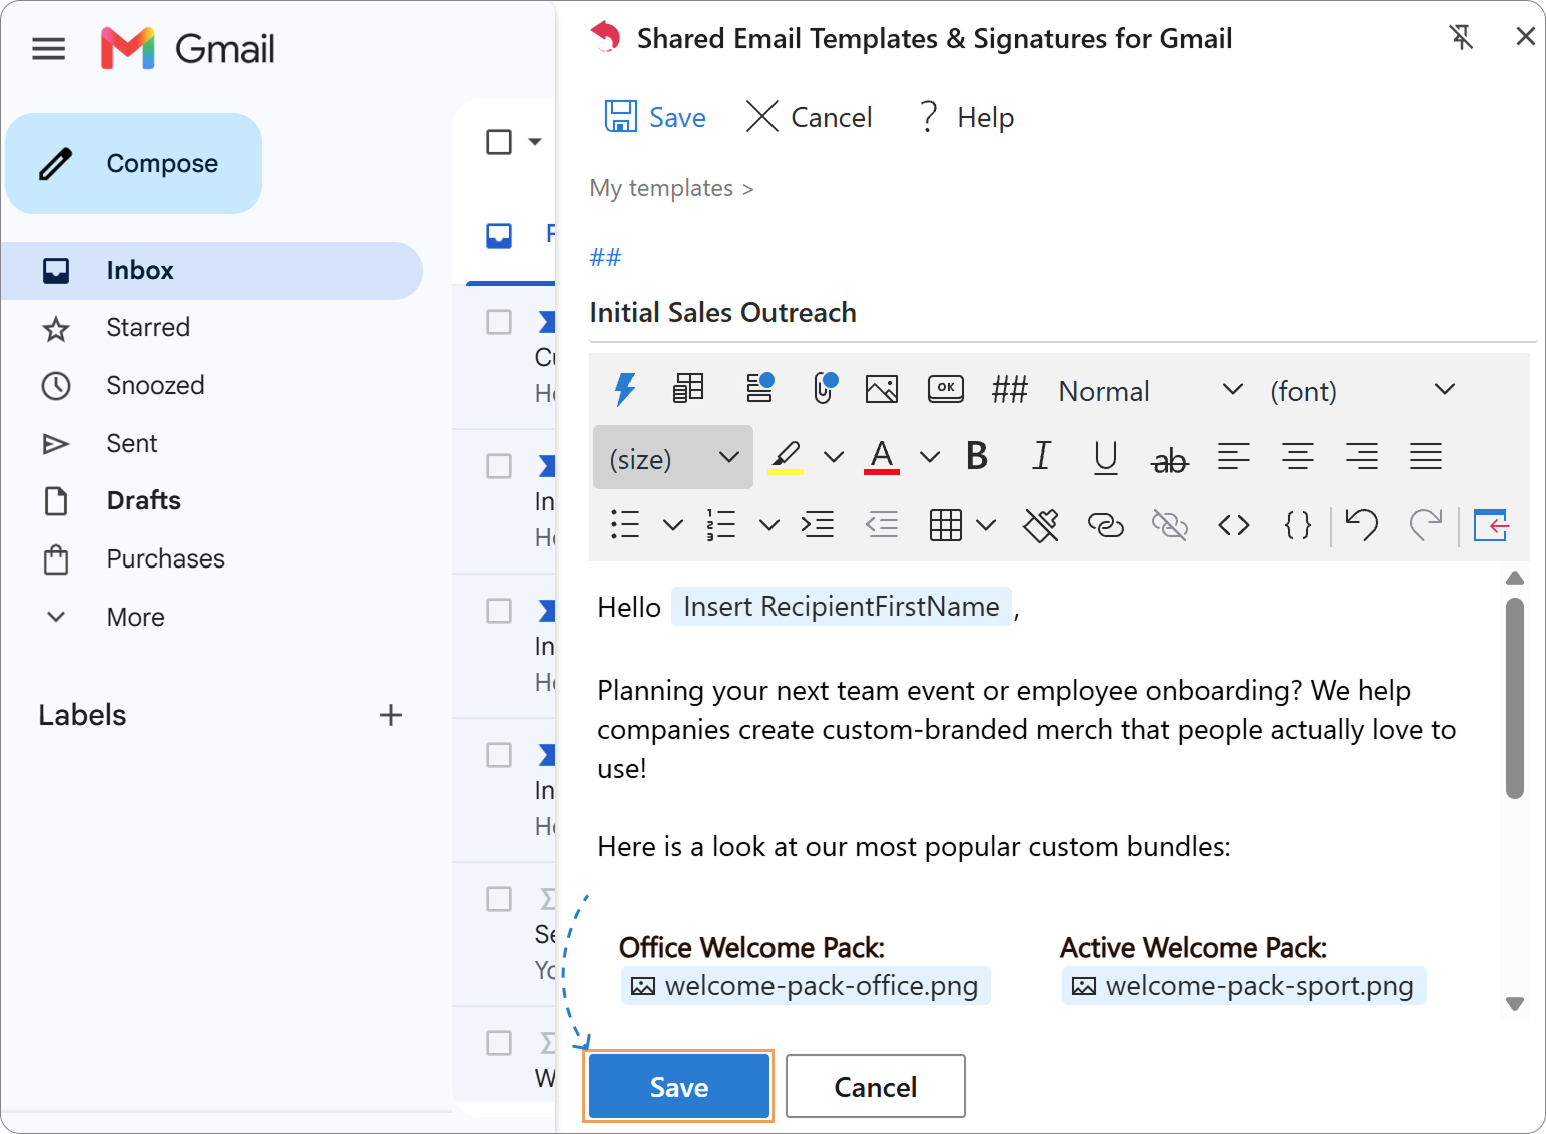
Your updates sync instantly across your account and for anyone on your team who shares access to that template folder.
Frequently Asked Questions (FAQ)
How to create a template in Gmail as a built-in feature?
- 1.Click Compose in Gmail.
- 2.Type the text for your template.
- 3.Click the three vertical dots at the bottom of the compose window.
- 4.Hover over Templates > Save draft as template.
- 5.Click Save as new template.
- 6.Type a name for your template and save it.
Why do I not have a native template option in Gmail?
Gmail’s built-in email template feature (formerly called “Canned Responses”) is disabled by default — you need to enable it first.
How to enable templates in Gmail?
- 1.In Gmail, click Settings > See all settings.
- 3.Go to the Advanced tab and scroll down.
- 4.Next to Templates, select Enable.
- 5.Click Save Changes at the bottom
Can you share Gmail email templates with your team?
Native Gmail templates cannot be shared. To share email templates, you need an add-on like Shared Email Templates & Signatures.
Do Gmail templates save attachments?
Standard Gmail templates automatically strip out attachments when you save them. If you need to send PDFs or documents along with your templates, use Shared Email Templates.
How many templates can you have in Gmail?
Native Gmail allows you to save up to 50 templates per account. With Shared Email Templates, there is no strict cap, and you can organize hundreds of templates into nested folders, tag favorites, and search them.
Can you use dynamic personalized fields in Gmail templates?
Native Gmail templates only support static text, meaning you have to manually type the recipient’s details every time. However, using Shared Email Templates, you can insert dynamic fields and variables to personalize every email automatically.